Original Post Date- 4/26/12, 10:42 PM Central Standard Time
*This post is updated with links/ updates about the FTU items.
-Magik 5/16/2021
This tutorial is borne from my own manipulated lil' mind.
Any similarity to any other tutorial(s) is purely coincidental.
This tutorial was written for those who have a working knowledge of PSP
and was written using PSP XI, tho' any version
should work.
Supplies Needed: Scrapkit: the beautiful FTU kit- Monochrome
Find the kit on her page
here.
*You will have to scroll down a bit.  Tube:
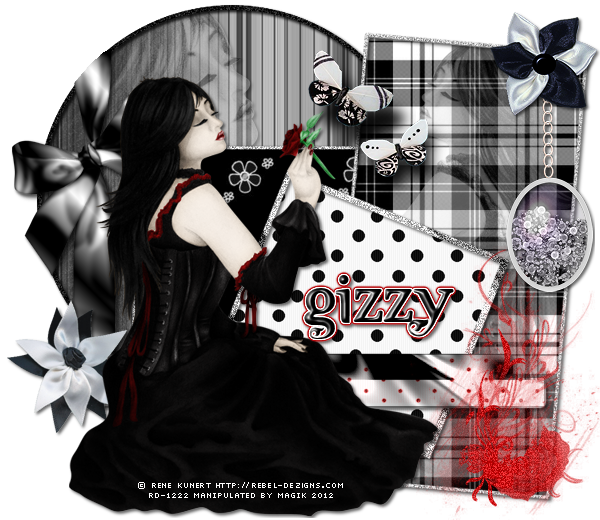
Tube: I'm using the lovely artwork from Rene Kunert, named black Rose.
I had bought this from her shop at Rebel Dezigns.
Do NOT use this artwork unless you have a license to do so
& have purchased the tube.
Template: Template 127 from Rachel at
Scraps of Enchantment.
This template was located
here, but is no longer avail.
Hopefully, you may have it in your PSP stash, though to still try
this tutorial.
Filters: Tramages- Metal Peacocks
DBS Flux- Bright noise
Xero- Radiance
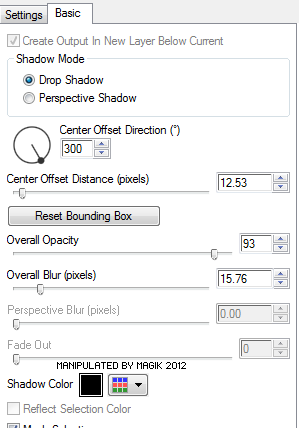
Eye Candy 5: Impact- Perspective Shadow.
Eye Candy 4000 Gradient Glow
Font: Dutch & Harley
Let's do this!
Save your progress often.
Drop shadow used in this tutorial is 2 2 60 4.
Open up the template.
Duplicate it & close original.
Delete the credit layer & resize the template so it's 600 px in width.
Working from the bottom layer of the template, up:
Circle Background- Select all- float.
Defloat- Invert.
Delete this layer & paste paper 7, resized 70%.
Hit delete & keep selected.
Add your close up or tube & hit delete.
Select none.
Crop to canvas.
Desaturate your tube
(I used the black & white closeup that is avail. with my tube)
& drop the opacity down to 40%.
Add a drop shadow.
Circle Frame- add a drop shadow.
Rectangle Background- Select all- float.
Defloat- Invert.
Delete this layer & paste paper 11, resized 70%.
Hit delete & select none.
Rectangle Frame- add a drop shadow.
Large Rectangle Background- Select all- float.
Defloat- Invert.
Delete this layer & paste paper 2, resized 70%.
Hit delete & keep selected.
Add your tube & hit delete. Select none.
Crop to canvas.
Desaturate your tube
(I used the black & white version that is avail. with my tube)
& drop the opacity down to 40%.
Add a drop shadow.
Large Rectangle Frame- add a drop shadow.
Square Background- Select all- float.
Defloat- Invert.
Delete this layer & paste paper 10, resized 50%.
Hit delete & select none.
Square Frame- Apply Tramages- Metal Peacocks at these settings:

Then add some noise- Uniform/ Monochrome/ 65%
& add a drop shadow.
Black & Grey Strips- Add Tramages- Metal Peacocks
to both at the same settings.
Then add a drop shadow to both.
Copy & paste element 5. Resize 60%.
Position this just over the black & grey strips.
Using the manual colour correction tool,
set the source to black & change the target to a dark-ish red:
Then change the blend mode to Overlay.
Using your eraser brush, remove the little bit of excess
that overhangs past the black strip.
On the Brush layer, using your manual color correction,
set the source to black &
change the target to a lighter red or another colour
that matches with your tube:
Then use DBS Flux- Bright noise to give it a more subtle 'sparkle':
Do NOT add a drop shadow to the brush.
Next, copy & paste your main tube.
Resize as needed.
Add Xero- Radiance at these settings:
Then add a drop shadow.
Now let's add some elements:
Element 12- resize 37% & sharpen.
Place to the right side & add a drop shadow.
Element 7- resize 45%. Sharpen.
Place in the top right corner above the 'chain' from element 12.
Using your manual color correction,
set the source to beige &
change the target to a light grey like shown in my example:
Then add a drop shadow.
Element 9- resize 19%.
Drag this below your main tube in the layers palette
& position on the left of the tag.
Next, go down to your circle layer- Select all- float.
Defloat- Modify- expand by 3 & Invert.
Go back to the bow layer & using your eraser,
erase the excess ribbon hanging on the top & on the bottom as shown:
Select none, then add a drop shadow.
Next, add element 17. Resize 45%.
Position on the left of your tag, 'behind' your tube.
Drag this layer under your tube layer in the layers palette (if needed)
& give it a drop shadow.
Element 8- Resize 60% & sharpen.
Position it so it's in the center of the tag.
Add Perspective Shadow at these settings:
Element 13- Resize 50% & sharpen.
Position it so it's in the center of the tag,
with the other butterfly.
Add Perspective Shadow at the same settings.
Next, crop/ resize your tag to your own preferences.
Then, add your proper copyrights & watermarks.
Now, add your name in black.
Add a bevel at these settings:
Then give it a gradient glow set at 3:
Then add a drop shadow.
Finally, merge visible & save as a PNG.
I hope you enjoyed trying this tutorial.
I'm always happy to see your results.
*hugz*


 Subject: FTU- Simple Elegance
  Sun 16 May 2021 - 20:22