Original Post Date- 5/24/12, 10:50 PM Central Standard Time
This tutorial is borne from my own manipulated lil' mind.
Any similarity to any other tutorial(s) is purely coincidental.
This tutorial was written for those who have a working knowledge of PSP
and was written using PSP XI, tho' any version
should work.
Supplies Needed: Scrapkit: Party Rock from
Tasha's Playground.
This kit is now FTU & can be found by clicking
this link.
*Leave some love when grabbing the kit.Tube: Magnolia from Lady Mishka.
This was a prepaid commission on
Pics For Design.
Do NOT use this artwork unless you have a license to do so
& have purchased the tube.
Filters: Xero- Radiance
Xero- Porcelain
Eye Candy 4000 Gradient Glow
Font: Lobster
Drop shadow used in this tutorial is 0 0 80 5.
Let's do this!
Save your progress often.
Open a new canvas 600 X 600 px.
Add frame 4. Resize 80%. Sharpen.
* Optional to change the frame colour-
Select the frame- float- defloat- Invert.
Copy & paste paper 8.
Hit delete & select none.
Delete the original frame.
With your magic wand,
click inside the left rec. of frame.
Modify- Expand by 2. Invert.
Copy & paste paper 12, resized 80%.
Hit delete.
Then add your tube.
Resize as needed.
Hit delete & select none.
Crop to canvas.
Duplicate your tube layer.
On the bottom tube,
change the blend mode to Luminance (L).
On the top one, add a gaussian blur of 3.
Change the blend mode to screen at 50%.
Add a drop shadow to the bottom tube.
Next, click inside both the right rectangles of the frame.
Modify- Expand by 2. Invert.
Paste paper 7, resized 70%.
Hit delete.
Next add your tube or closeup.
Hit delete & select none.
Crop to canvas.
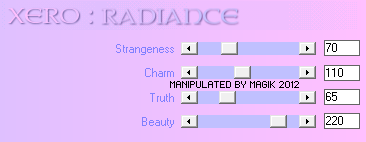
Apply Xero- Radiance to your closeup at these settings:
Then drop the opacity down to 75.
Add a drop shadow.
Move your frame above your paper & tubes in layers palette.
Add a drop shadow to the frame.
Next add your main tube.
Position her on the right side of the frame.
Then apply Xero- Radiance at these settings:
Next add Xero- Porcelain at these settings:
And finally add your drop shadow.
Now we'll add some elements.
For each one I added,
I sharpened & added a drop shadow,
unless specified otherwise.
Stars- 75%.
Position on the bottom left.
Right click in layers & send to bottom.
Dots- 80%.
Place to the top left.
NO drop shadow.
Move this layer above the stars in layers palette.
bow- 60%.
Place in the top left corner of the frame.
Flower 4- 60%.
Mirror.
Place on bottom left corner of frame.
cake 2- 50%.
Place off center to the left.
Partyhat- 60%.
Place in front of the cake.
Drink -45%.
Duplicate.
Place both on the side of the cake.
Marble- 70%.
Place in front of the drinks.
Present- 55%.
Place on the other side of the cake.
Present 2- 55%.
Place it in front of the other present.
word art- 65%.
Add a medium gradient glow:
before you add your drop shadow.
Add a new layer & add the word 'life' to your tag.
Add some noise- Uniform/ Monochrome/ 80%.
Add the same gradient glow & drop shadow.
Next, crop/ resize your tag to your own preferences.
Then, add your proper copyrights & watermarks.
Now, add your name.
Add a bevel at these settings:
Give it a gradient glow at the same setting as the word art.
Then add a drop shadow.
Finally, merge visible & save as a PNG.
If you tried this tutorial, I'd enjoy seeing your results.
*hugz*


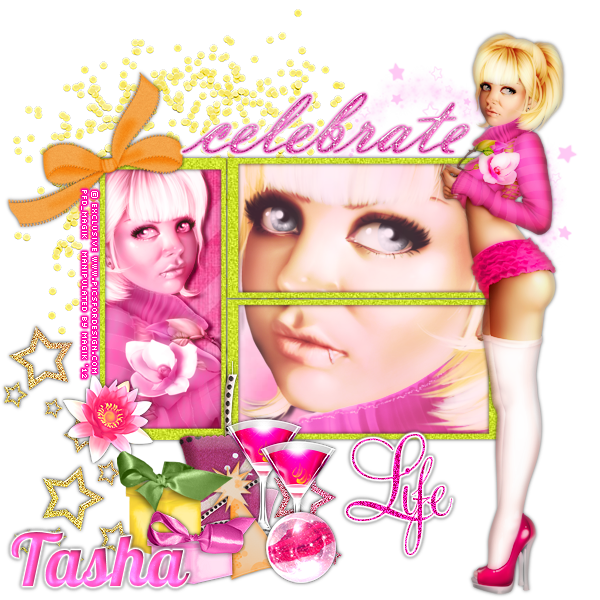
 Subject: PTU Now FTU- Celebrate Life
  Thu 20 May 2021 - 0:12


