Original Post Date- 8/13/12, 1:28 AM Central Standard Time*The kit I used in this tutorial is one of mine.
It was a 'limited time' freebie on my blog.
It is now available in The Phantom Gate area of the forum here
for members once they reach a certain 'Level'.  -Magik 5/21/2021
This tutorial is borne from my own manipulated lil' mind.
Any similarity to any other tutorial(s) is purely coincidental.
This tutorial was written for those who have a working
knowledge of PSP and was written using PSP XI,
tho' any version
should work.
Supplies Needed: Scrapkit: I'm using my limited time
Sleepwalking Past Hope bonus freebie.
*It is a FTU kit for site members here, once they reach a certain level.
-Magik 5/21/2019Tube: I'm using the artwork of Alfadesire.
This tube was given for donations for the NDAF fundraiser.
You can find more of Alfadesire's great art at
PFD, however.
Do not use this artwork unless you have a license to do so
& have donated for NDAF.
Mask: of choice
Filters: Xenofex 2- Stain
Xero- Radiance
Eye Candy 4000- HSB Noise
Eye Candy 4000 Gradient Glow
Font: Shit Happens
Drop shadow: 4 0 45 4, black.
Save your progress often.
Let's do this!
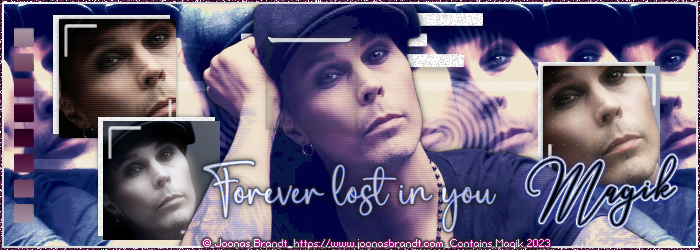
Open a new canvas 650 X 650 px.
Copy & paste a paper of choice.
Apply your mask of choice.
Merge group & resize as needed.
Next copy & paste frame 3.
Resize 75%.
With your magic wand, click inside the frame.
Modify & expand by 4. Invert.
Add another paper of choice, resized 75%.
Hit delete.
Next, add your tube or closeup.
Resize 80%.
Hit delete.
Select none.
Crop to canvas.
On your closeup,
apply Xenofex 2- Stain at these settings:
Then bring the opacity down to 60% on the tube.
Add a drop shadow to your tube & the frame.
Next, add your main tube.
Resize 55%.
On your tube, apply Xero- Radiance:
Add your drop shadow to the tube.
Now we'll add some elements.
For each one I added, I sharpened & added
a drop shadow to, unless specified otherwise.
roses- 60%
spider- 20%
Rotate 18 right.
winged heart- 65%
skulls- 50%
cross- 40%
Rotate 12 right.
bottle- 37%
crow- 23%
heartagram scatter- 80%
Duplicate.
Move one down towards the bottom right.
butterfly- (2)
Resize one 25% & the other 20%.
Rotate the bigger one 24 left.
Drop shadow- 10 10 40 10
Rotate the smaller one 17 right.
Drop shadow- 15 5 40 10
Add any other elements if you prefer.
Next, copy & paste one of the wordarts.
Duplicate.
On the bottom one, add a gradient glow:
Then apply HSB Noise at default settings to the same layer.
Then add a drop shadow.
Now add your proper copyrights & watermarks.
Now add your name.
Add your gradient glow:
Now add your drop shadow.
Finally, merge visible & save as a PNG & enjoy.
I hope you enjoyed trying this tutorial & enjoy the kit.
I'd love to see any of your results.
*hugz*


 Subject: Limited FTU- Sleepwalking Past Hope
  Fri 21 May 2021 - 22:59