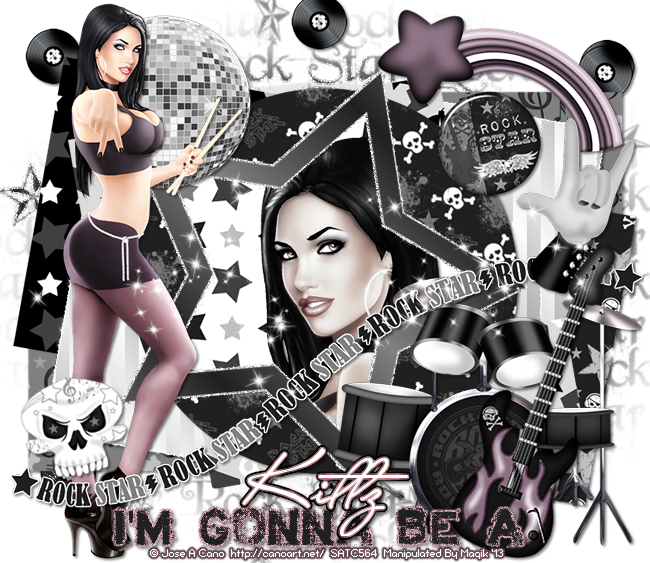
Original Post Date- 7/13/13, 4:18 AM Central Standard Time*The kit I used for this tutorial is no longer available to download,
however, if you had grabbed this kit in the past,
you still will be able to try this. -Magik 5/26/2021
This tutorial is borne from my own manipulated lil' mind.
Any similarity to any other tutorial(s) is purely coincidental.
This tutorial was written for those who have a working
knowledge of PSP and was written using PSP X2,
tho' any version should work.
Supplies Needed: Scrapkit: I'm using a FTU kit from Kittz Kreationz
named rock star.
*Unfortunately, this kit is no longer hosted on her 4-shared account to download.Tube: I'm using the artwork of Jose Cano.
I had bought this fab artwork at SATC.
His artwork can now be found
here.
Do NOT use any artwork unless you have a license to do so
& have purchased or obtained the tube legally.
Template: Template-201 from Kristin at Toxic Desirez.
You can find the template
here.
Mask: music mask 2 (Vicky) at the Creative Misfits.
Find the pack with the mask
here.
*Please note- only the mediafire link is active. Filters: Xenofex 2- Constellation
DSB Flux- Linear Transmission
Mura Meister- Copies
Eye Candy 4000- Gradient Glow
Fonts: Acid Label (or font of choice): for the text
Carolina: for the name
(I used bold for my example)
Drop shadow: 2 2 50 4, black.
*Make sure to leave lots of love for the free supplies.

Save your progress often.

Let's do this!

Open up a new image: 750 X 750 px.
Flood fill with #202020 & apply your mask.
Merge group.
Now, open up the template.
Duplicate it & close original.
Delete the credit layer at the top.
Working from the bottom layer of the template, up:
Copy & paste your masked image above raster 1.
Resize 110%.
Apply Xenofex 2- Constellation
to your mask layer at these settings:
Merge Copy of Raster 8 onto raster 8.
Then, select all- float. Defloat- Invert.
Delete this layer & paste RS-P3.
Hit delete & select none. Crop to canvas.
Add a drop shadow.
Raster 7- Select all- float. Defloat- Invert.
Delete this layer & paste RS-P6, resized 80%.
Hit delete & select none.
Copy of Raster 7- select all- float. Defloat- Invert.
Delete this layer & paste RS-P2, resized 80%.
Hit delete & select none.
Crop to canvas.
Drop shadow.
Merge Copy of Raster 6 onto Raster 6.
Then, add a new layer above this merged layer.
Flood fill with a gradient: #FFFFFF & #808080.
Angle- 45/ Repeat-3/ Invert box ticked.
Now apply DSB Flux- Linear Transmission
at these settings:

Now, on your merged Raster 6 layer,
select all- float. Defloat- Invert.
Delete this layer & on your linear transmission layer
hit delete & select none.
Then, add Xenofex- Constellation
at the same settings.
Drop shadow.
Copy of Raster 5- Merge down onto Raster 5.
Then, select all- float. Defloat- Invert.
Delete this layer & paste RS-P7, resized 80%.
Hit delete.
Select none.
Raster 4- Select all- float. Defloat- Invert.
Delete this layer & RS-P4, resized 80%.
Hit delete. Select none.
Crop to canvas.
Drop shadow.
Copy of Raster 1- Select all- float. Defloat- Invert.
Delete this layer & RS-P1, resized 80%.
Hit delete.
Keep selected.
Add your tube or closeup.
Hit delete & select none.
Crop to canvas.
Duplicate your closeup layer.
On the top one, add a Gaussian blur of 3.
Change the blend mode to Soft Light.
On the bottom layer, change the blend
mode to Luminance (L).
Then add a drop shadow to this layer.
Copy of Raster 3- desaturate.
Raster 3- Select all- float. Defloat.
Delete this layer & add a new layer.
Flood fill with a gradient:
#202020 & #808080. Angle- 45/ Repeat-3
or a gradient of choice.
Hit delete. Select none.
Next add your main tube.
Resize as needed.
Position on the left of the tag.
Apply Xero- Radiance at these settings:
or use settings that don't wash out the colours much.

Add a drop shadow.
Next we'll add some elements.
For each one I added a drop shadow to,
unless specified otherwise.
RS-11- 50%.
Place in the top left &
move below your tube in layers palette.
RS-45- 85%.
See my tag for position.
RS-33- 60%.
Place on the lower right.
Move below the word art in layers palette.
RS-30- 20%.
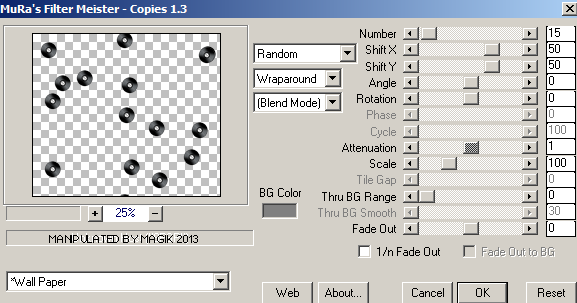
Apply MuRa Meister- Copies at these settings.

You may have to play with the Attenuation
to get a setting you like.

Then send to the bottom in layers palette
so its below your mask layer.
If need erase any excess. Drop shadow.
RS-17- 65%.
Place this in the top right.
Use your manual color correction
to change to a colour from your tube,
using this as your source- #5f5f5f.
RS-7- 40%.
Place this in the top right,
below the star/ rainbow.
RS-28- 60%. Desaturate.
Place on the right.
RS-16- 60%. Rotate 25 left.
Sharpen & place this with the drums.
Use your magic wand to select the flames.
The use your MCC to change the colour,
using ##c4c4c4 as your source & the same
colour as your target.
RS-13- 40%.
Rotate 10 left.
Place above the word art on the left.
Add any other elements, if you prefer at this time.
Then copy & paste RS-10.
Use your eraser to remove excess that
you don't want on your tag.
Now, crop/ resize your tag to your own preferences.
Then, add your proper copyrights & watermarks.
Now add a new layer.
With a font of choice, add the text:
I'm gonna be a
Position the text at the bottom of the tag.
Add a gradient glow at these settings,
using a colour from your tube:
Then add your drop shadow.
Next add your name in white.
Then add a gradient glow,
again using a colour from your tube:
Add a drop shadow.
Finally, merge visible, save as a PNG & enjoy.
I hope you have fun trying this tutorial.
I'd love to see your rockin' results.

*hugz*
*Originally re-posted Nov 5th 2019 at http://himaddicts.spruz.com/
**Edited & updated by Magik on 26 May, 2021


 Subject: FTU- Gonna Be A Rock Star!
  Wed 26 May 2021 - 20:29


