Original Post Date- 1/16/12, 1:46 PM Central Standard Time
This tutorial is borne from my own manipulated lil' mind.
Any similarity to any other tutorial(s) is purely coincidental.
This tutorial was written for those who have a working knowledge of PSP.
This tutorial was written using PSP XI, tho' any version should work.
This is a pretty simple/ easy-peasy tutorial.
Promise.

Supplies Needed:
Tube of choice. For the first example,
I am using the stunning artwork from Olivia.
This tube was available at
CDO, but she has since left there.
At the time of my making this tutorial, it is unknown where to buy her tubes.
Any other tube will work nicely for this tutorial, also.

My other example at the bottom uses the artwork of Keith Garvey.
Do NOT use this artwork unless you have a license to do so & have purchased the tube(s).
Scrapkit is Amore. This is a pay to use kit & can be found
by visiting Bibi's blog here.
*This kit is no longer available for sale.Any other kit will work too as long as it has some heart scatters.

Template: Heart Forum set temp from me,
here.
There is a PSP & PSD version avail. depending on what program you use.
* This forum set can be used for anything else,
just do not include in your supplies for tutorials, please.
Thank you.
Font: Any thin script font will work.
Filters: Eye Candy 4000 Gradient Glow (optional for name)
Let's do this!
Save your progress often.
Drop shadow used for this tutorial is 1 4 40 4,
except for the name which is 1 1 40 4.
Open up the sig tag & avi templates.
Duplicate them & close originals.
Delete the credit layer at the top on both.
For the sig-tag temp:
You can change the background layer to your choosing-
Selections- select all.
Float- defloat- new layer & then flood-fill
with a new colour or gradient or copy/ paste a resized paper.
Then delete the original layer.
For mine, I left it as is.
On your frames layer, colourise it to your own preferences.
Add noise: Uniform, 65%, Monochrome.
Next, copy & paste BC Amore (39)
(or any heart scatters)
Resize 80%. Sharpen & add a drop shadow.
Position one over to the bottom left.
Duplicate, mirror.
Copy & paste this element again.
Resize 80%, sharpen & drop shadow,
Position this one to the center left.
Duplicate & mirror.
Merge these four layers together
& then drag this layer below your
heart background layer in layers palette.
Next, at the top layer of your sigtag, copy & paste BC Amore (41).
Resize 40%. resize again 80%.
Sharpen & add your drop shadow.
If you look at mine, I positioned it so the 'V' lines up
with the inner point of the heart.
Next, with your magic wand,
click inside the left heart on the frame.
Selections- Modify- Expand by 2. Invert.
Copy & paste your tube of choice.
Resize if needed. Hit delete on your keyboard. Select none.
Drag this layer below your frames.
Crop your tag to canvas
(surround the whole tag when cropping to eliminate any
'phantom shadows' showing up on the edges.)
Duplicate your tube. Mirror. Merge down.
Duplicate your merged tube layer.
On the bottom layer, change the blend mode to Luminance (L).
Add a drop shadow.
On the top tube layer, Adjust- Blur- Gaussian Blur -3.
Set this layer to Soft Light in your layers palette.
Now you can add your copyrights/ watermarks.
Next add your name.
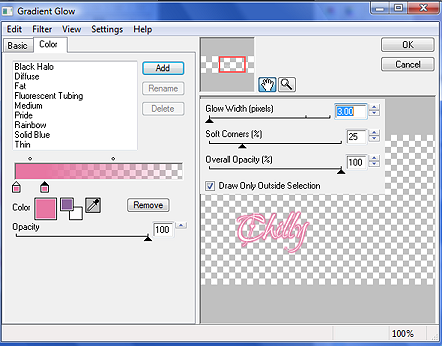
This is the Gradient glow settings I used for mine:
Add the thin drop shadow.
Merge visible & save as a .PNG.
For the avi:
Do the same as above, except only ONE heart scatter is needed.
Resized at 80%, sharpen & add a drop shadow.
Omit using the Love wordart.
Add your tube, this time resize it a bit smaller.
After cropping to canvas, Duplicate it.
Bottom tube set to Luminance (L) with a drop shadow.
On the top one, Blur- 3 & changed to Soft Light.
Add the copyrights/ watermarks.
Next, add an initial.
Add a Gradient Glow & thin drop shadow.
Then merge all visible & save as a .PNG
Here's the Keith Garvey version:
I hope you enjoyed this tutorial & creating your forum set.
I'd love to see your results from trying this one.
*hugz*


 Subject: PTU- Heart Forum Set
  Sat 15 May 2021 - 3:28


