Original Post Date- 7/4/12, 2:19 AM Central Standard Time*The template I used for this tutorial is no longer available,
however, if you had download it from Tamie in the past,
you can try this.  -Magik 5/20/2021
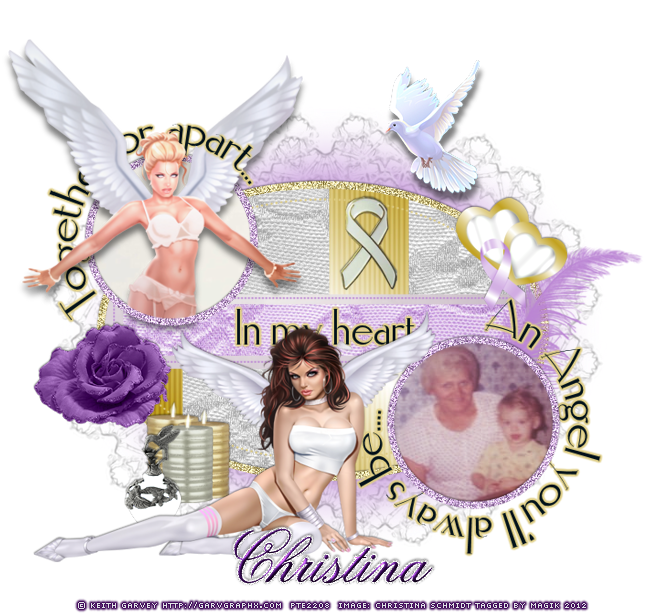
 I wanted to do something very special for my Sis
Tragedy since she is like the sister I never had.
She made this elegant kit for Bone Cancer Awareness
in honour of her Grandmother.
I had been waiting for the right tube to come along
to do this for her. And thank you to Keith Garvey for it.
The image I used in this tutorial is Tragedy's (Christina's).
I had obtained her permission to use it for this tutorial & tag.
This is one of those tuts to pay honour to one of our own
loved ones, so please use an image of someone
close to your own heart to make it more special.
With that being said, Tragedy- I love you, Sis!
*hugz*This tutorial is borne from my own manipulated lil' mind.
Any similarity to any other tutorial(s) is purely coincidental.
This tutorial was written for those who have a working
knowledge of PSP and was written using PSP XI,
tho' any version
should work.
Supplies Needed: Scrapkit: I'm using the beautiful/ elegant FTU scrapkit
from my Sis Tragedy, Hold Onto Hope.
You can get this from her blog
here.
*Leave some love for the kit, please.2-3 Tubes: I'm using the stunning artwork of Keith Garvey.
I had bought both of these at PTE.
Do NOT use this artwork unless you have a license to do so
& have purchased the tube.
Template: TEM2 from Tamie at Addictive Pleasures.
*This template is no longer on Tamie's 4-shared to be downloaded.Word art: from me,
here.
Photo: personal photo of choice.
Filters: Xero- Soft Vignette
Xero- Radiance
DSB Flux- Bright Noise
Eye Candy 4000 Gradient Glow
Font: Gran Prix ES
Drop shadows used in this tutorial: -1 0 50 2, black
10 2 50 8- for the one Angel tube & dove.
Save your progress often.
Let's do this!
Open up the template.
Duplicate it & close original.
Delete the credit layer at the top.
Resize the template so it's 600 px in width.
Then, change the canvas size so it's 750 X 750 px,
with 80 px set for the top.
Next, delete these layers:
angel word 3
angel word 2
angel word
Now, working from the bottom layer of the template, up:
masked layer-
Use your manual color correction tool
to change the colour to the Lavender from the
colour palette in the kit.
oval -
Select all- float. Defloat- Invert.
Delete this layer & paste Paper 6, resized 70%.
Hit delete & select none.
pink strip 1-
Select all- float. Defloat- Invert.
Delete this layer & paste Paper 2, resized 70%.
Hit delete & select none.
Do the same for pink strip 2, using the same paper.
dotted oval-
use your manual color correction tool.
Change it to a light gold colour from the 'gradient' in the colour palette.
rectangle 1-
Select all- float. Defloat- Invert.
Delete this layer & paste paper 12, resized 70%.
Hit delete & select none.
dotted rectangle-
color correction: change to lavender.
rectangle 2-
Select all- float. Defloat- Invert.
Delete this layer & paste Paper 8, resized 65%.
Hit delete & select none.
glitter oval frame-
Manual Color correction: Light gold.
Add noise: Uniform/ Monochrome/ 75%.
Add a drop shadow.
circle 1-
Select all- float. Defloat. Invert.
Delete this layer & paste paper 11, resized 65%.
Hit delete & keep selected.
Add one of you tubes.
Resize 80%.
Use your eraser to remove the bottom half
that extends past the circle.
Select none.
On your tube, apply Xero- Soft Vignette at default settings.
Add a drop shadow: 10 2 50 8
circle frame 1-
manual color correction: #d9bae6
Add the same noise as before.
Duplicate.
Move one below your tube & drop shadow.
On the one above your tube, use your eraser
to remove the excess that covers the upper body.
circle 2-
Select all- float. Defloat.
Invert.
Delete this layer & paste paper 11, resized 65%.
Hit delete & keep selected.
Add your photo of choice or tube.
Resize as needed.
Hit delete & select none.
On your photo, go to Effects- Photo Effects- Film & Filters
set it Glamour/ Champagne/ 20.
circle frame 2-
manual color correction: #d9bae6
Add the same noise again.
Drop shadow.
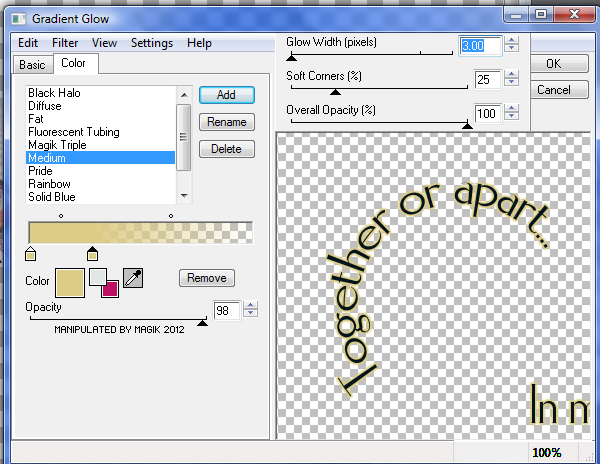
Next, copy & paste the word art.
Add a thin gradient glow in light gold at these settings:
Duplicate.
Move one below the tube layer.
On the top one, erase some of the wordart
that is covering part of the tube.
NO drop shadow.
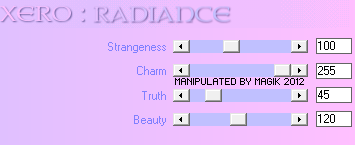
Now, copy & paste your second (or third) tube.
Resize 70%.
Mirror.
Add Xero- Radiance at these settings:
Then add a drop shadow.
Next we'll add some elements.
For each one I added, I sharpened & added
a drop shadow to, unless specified otherwise.
Doily- right click & send to bottom in layers palette,
below the mask layer.
Position it off to the left.
Duplicate & Mirror.
NO drop shadow.
Heart Ribbon- 25%
Rose 3- 30%
Feather 3- 35%.
NO drop shadow.
Candle Trio- 23%
Bone Cancer Ribbon- 40%
Dove 3- 30%.
Use the same drop shadow as for the first tube.
Feather 1- 20%
Perfume Bottle- 40%
Add any other elements, if you prefer at this time.
Now, crop/ resize your tag to your own preferences.
Then, add your proper copyrights & watermarks.
Now add your name.
Add a bevel:
Then add a gradient glow:
Then add a drop shadow.
Delete the white background at the bottom.
Merge visible, save as a PNG & enjoy.
I had made one for my daughters (its too girly for my son)
in memory of their father who left us 17 yrs. ago,
as of the 10th of this month, from other causes.
I changed out the photo & a few elements for this tag:

Again, this is a special tribute tag to make for those we love-
who have left us or are simply dear to our hearts.
I really hope you enjoy this tutorial
& making something very special for yourselves.
I would love to see any of your results.
*hugz*


 Subject: FTU- Angel In My Heart
  Thu 20 May 2021 - 21:58
 -Magik 5/20/2021


