Original Post Date- 1/20/13, 6:01 PM Central Standard Time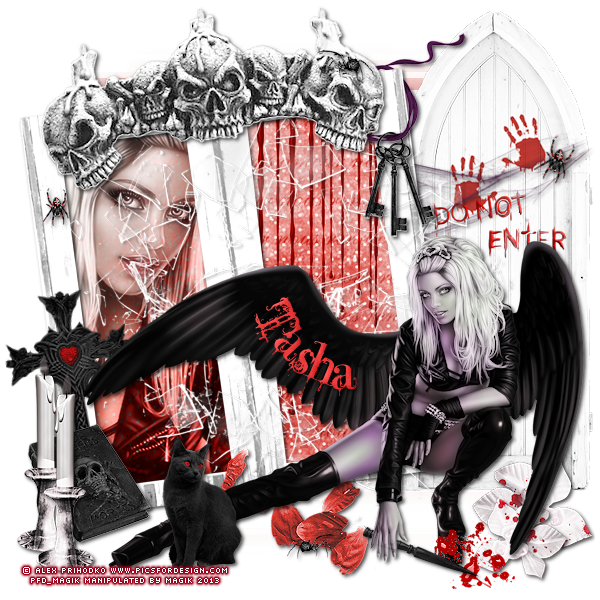
This tutorial is borne from my own manipulated lil' mind.
Any similarity to any other tutorial(s) is purely coincidental.
This tutorial was written for those who have a working
knowledge of PSP and was written using PSP X2,
tho' any version should work.
Supplies Needed: Scrapkit: I'm using Vamp/Goth kit from Tasha's Playground.
This was a PTU kit, but you can grab it free
here.
*Leave a thank you for the kit, please.  Tube:
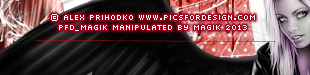
Tube: I'm using the artwork of Alex Prihodko.
You can find more beautiful artwork here at
PFD.
Do not use this artwork unless you have a license to do so
& have purchased the tube.
Mask (optional): of choice
Filters: Xero: Moodlight.
Xero: Radiance
Font: A Lolita Scorned
Drop shadow: 2 2 70 5, black.
Save your progress often.

Let's do this!

Open a new canvas 600 X 600 px.
Next, add frame6.
Move over to the left.
With your magic wand,
click inside both rectangles of the frame.
Modify- Expand by 4. Invert.
Copy & paste paper2, resized 70%.
Hit delete & select none.
Move the paper below the frame in layers palette.
Now click inside the left rectangle of the frame with your wand.
Modify- Expand by 4. Invert.
Add your closeup or tube & hit delete.
Select none.
Move below the frame in layers palette & crop to canvas.
Duplicate your closeup.
On the top one,
add a Gaussian Blur of 3.
Change the blend mode to Soft Light at 80%.
On the bottom one, change the blend mode
to Luminance (L) AT 80%.
Add a drop shadow to the frame.
Add your main tube.
Resize as needed
(for mine, I resized 35%).
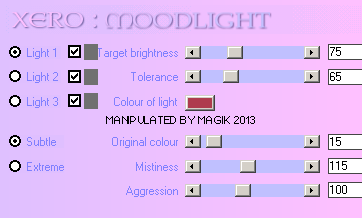
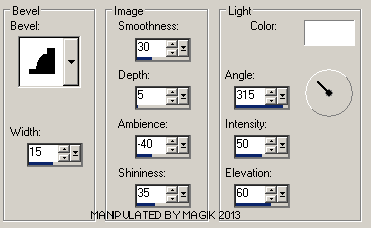
Add Xero: Moodlight at these settings,
using #ae3b4e for your colour of light:
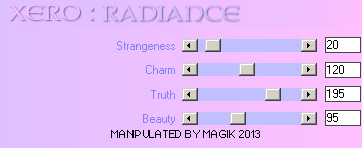
Then apply Xero: Radiance to brighten it up a bit:
Finally, add a drop shadow to your tube.
Now we'll add some elements.
For each one I added, I sharpened & added
a drop shadow to, unless specified otherwise.
door- 80%.
Move to the right of the frame.
Move to the bottom in layers palette.
No drop shadow.
warning- 25%.
Place on the door like in my example.
No drop shadow.
web- 40%.
Place above the warning.
Move to just above the door in layers palette,
to hide the excess.
blood drip 2- 60%.
Place inside the right side of the frame
& move below frame in layers palette.
Duplicate.
Change the blend mode on the top one to
Multiply at 85%.
No drop shadow.
glass- Add above the frame layer.
Move it down just a bit in your canvas.
No drop shadow.
petals- 37%.
Place below your tube.
dagger- 30%.
Position it so its above your tube's hand.
Then use your lasso to draw around the handle like shown
(you may have to zoom out for this):
Then hit delete on your dagger layer.
Select none.
splatter- 35%.
Place near the tip of the dagger.
If a little gets on the boot of your tube,
so much the better.

No drop shadow.
cat2- 40%
Move to the left, near the foot of your tube.
cross3- 60%.
Rotate 10 left.
Place on the bottom left of the frame.
book- 35%.
Place to the left corner of frame,
by the cross.
candle- 50%.
Duplicate & mirror the second one.
Place both to the left, by the book.
ribbon- 35%.
Mirror.
Place at the top right of the frame.
Link to 1 & duplicate.
Move one to just above the door in layers palette.
On the top one, use your eraser to remove
some of the ribbon in the top corner of the frame.
Add your drop shadow to the top ribbon.
keys- 30%.
Using your eraser set at size 5 or 6, erase
a small bit from the right side of the ring,
so it loops into the ribbon.
skulls- 70%.
Rotate 8 left.
Place at the top center of frame.
spider2- 25%.
Place by the petals.
Add the spider again, resizing this one 30%.
Place on the right skull.
spider1- 30%.
Rotate 25 right.
Place on the web on the door.
Add another & resize this one 25%.
Place this one on the left side of frame.
Add any other elements if you prefer.
Crop & resize to your own liking.
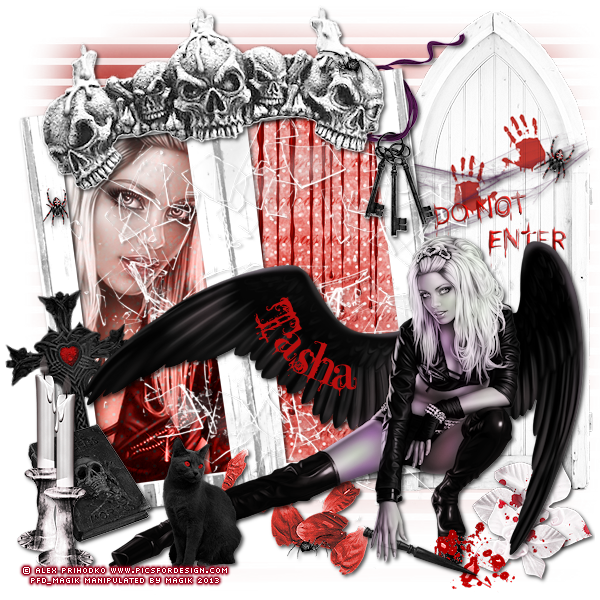
Now add your proper copyrights & watermarks.
Now we're going to add your name, on a curve. *WES*
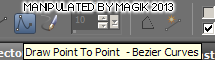
First, select your pen tool.
On your toolbar, select the Draw Point to Point tool
(as seen highlighted in blue here):
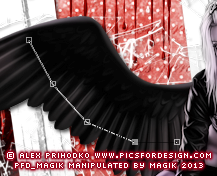
Now Place a node on your tag.
Then place another node across from it,
if you can see my example (the line is in red):
Now in your toolbar, select the edit option
(the darker blue):

Now, holding down your CTRL button, add a node
1/4 of the way on the line.
Do the same on the right side
so you have 2 more nodes showing:
* I placed a 3rd node in between these 2 to make it easier for getting a more desirable curve. Now carefully grab the right middle node
& when the crossbow shows up,
carefully nudge that node down,
to make your curve.
Do the same with the other nodes
until you get your desired curve.
You can move the outside nodes in, etc. if needed.
It should look something like this:
Now create a new layer below this curve layer.
Next, back on your curve layer, click on your text tool.
Move your mouse onto your curve.
When you get the 'A' with a curve under it,
click for your text box to pop up & add your name
(you can use your space bar to position the text, if needed).
Apply your name as a floating selection.
Delete your curve layer WHILE your name still has
the marching ants around it.
Now on your name layer, select none.
Now, you can add a bevel to your name:
Now add your drop shadow.
Now if, you wish to add a mask, copy & paste paper7.
Apply the mask & merge group.
Resize 115%.
Right click in layers palette
& send to bottom.
This is what your tag will look like with the mask:
Finally, merge visible & save as a PNG & enjoy.
I hope you enjoyed this tutorial & it wasn't
too much of a hassle making your curve.

I'd love to see your results if you try it.
*hugz*
*Originally re-posted Nov 4th 2019 at http://himaddicts.spruz.com/
**Edited & updated by Magik on 23 May, 2021


 Subject: PTU Now FTU- Dark Angel Rising
  Sun 23 May 2021 - 2:49