This tutorial is borne from my own manipulated lil' mind.
Any similarity to any other tutorial(s) is purely coincidental.
This tutorial was written for those who have a working
knowledge of PSP and was written using PSP X2,
tho' any version should work.
 Supplies Needed:Template:
 I'm using template 259 from HorsePlay's Pasture
which you can find on her blog
here.
*Leave a thank you for the templates. Texture: I'm using 'Krypteriahg-14-5' from KrypteriaHG's
'Dark Side of Light' texture pack
here.
*Leave a thank you for the textures. Gradient(s): I'm using several gradients from ElvenSword's
'Heritage Platinum' pack
here.
*Leave a thank you for the gradients.Tube or image: For my first example
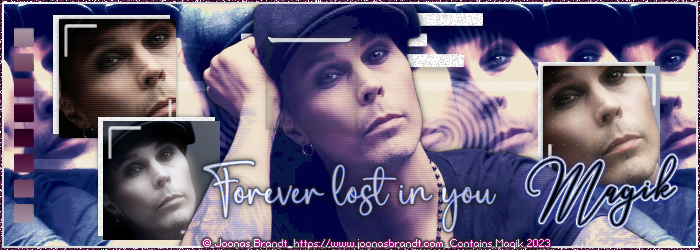
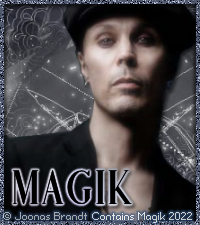
I am using an image of Ville Valo
from the amaizng photographer Joonas Brandt.
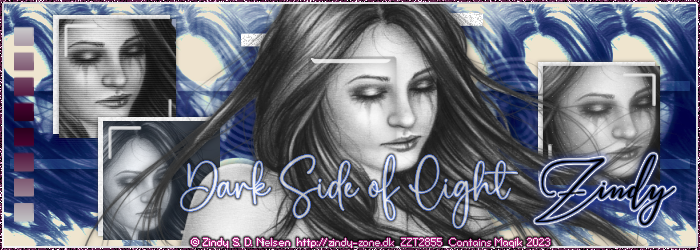
For my other example, I'm using the artwork of Zindy.
You can currently buy her artwork at her store, here.
https://zindy-zone.dk/Do NOT use
any artwork unless you have a license to do so
& have purchased or obtained the tube legally.
Filters: Mura's Meister- Copies
Xero- Greyscaler
Penta- Color Dot (optional)
Jeux de lignes- Entrelacement
Eye Candy 5 Impact- Glass
Eye Candy 4000- Gradient Glow
Fonts: Pixel font of choice for watermarks/ copyrights.
Lalisa (for words/ text)
Love Hewits (for name)
Drop shadows: 5 0 20 6, black
0 0 50 6, black
0 0 65 10, black
0 0 65 10, #0928b5 (for name)
*If wanting to achieve the same 'colouring' effectas I have in my examples, use the same exact hex codesfor the colours & blend modes I give you.Otherwise, feel free to play around to your own taste/ preference. **It should be noted that those portionsof this tutorial are going to 'recolour' yourimage or tube in a way. Please follow the artists' TOUbefore recoloring to make sure it is allowed before proceeding with that portion of the tutorial. 
This tutorial is going to use a lot of layers &
a lot of blend modes, so save your progress often.

Let's do this! =)
Add the gradients to your gradient folder
or another folder you have your gradients point to.
Open up the template. Duplicate it & close original.
Delete the credit layer at the top.
This template was a bit small for what I wanted to make,
so I resized the template to 700 px on the longest side.
This made the template 700 X 255.
I then cropped the temp to take off those 5 extra pixels
making it 700 x 250 px.
Next, I went to Layer 5 on the template,
& used my selection tool to remove the top
& bottom square like this example:
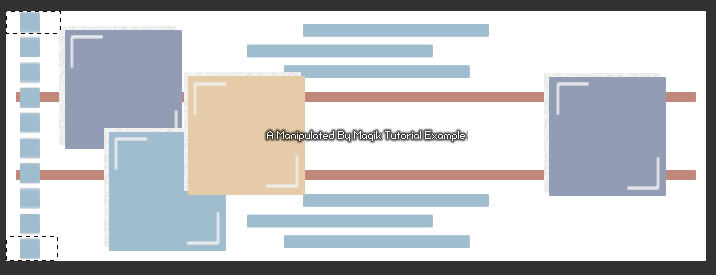
Once selected, hit delete on your keyboard & select none.
Close out all your layers except the white background layer.
Now, working from the bottom layer of the template, up:
Copy & paste your close-up tube or image of choice
above the white background layer.
Resize to 60-80% depending on what you're using.
Next, apply Mura's Meister- Copies- Line:

Duplicate this layer.
On your duplicate, add a Gaussian Blur of 5.
Then change the blend mode on this layer to Screen at 70%.
Add a new layer.
Flood fill this layer with the ES Platinum 44 gradient:
Linear- Angle- 0, Repeats- 0.
Change the blend mode to Dodge at 100%.
Next, copy & paste the Krypteriahg-14-5 texture
(or your texture of choice).
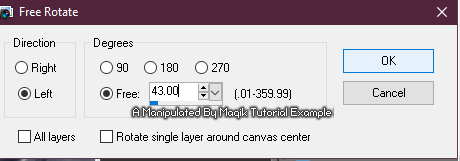
Rotate it like shown:
Change the blend mode of this layer
to Soft Light at 80%.
Add a new layer.
Flood fill this layer with #dcc0ab.
Change the blend mode of this layer
to Multiply at 40%.
Add a new layer.
Flood fill this layer with #000040.
Change the blend mode of this layer
to Exclusion at 60%.
Add a new layer.
Flood fill this layer with #b9d3f7.
Change the blend mode of this layer
to Soft Light at 100%.
Duplicate this layer & change the
blend mode to Burn 100%.
Add a new layer.
Flood fill this layer with #ecd5c5.
Change the blend mode of this layer
to Soft Light at 60%.
Add a new layer.
Flood fill this layer with #000040.
Change the blend mode of this layer
to Soft Light at 60%.
Finally add one more layer.
Flood fill this layer with #f7cde3.
Change the blend mode of this layer
to Saturation (L) at 50%.
Next, on Layer 1 & Layer 2-
I used manual colour correction to change the colour
of these layers with #a0bdcf as the Source
& #ffffff as my Target.
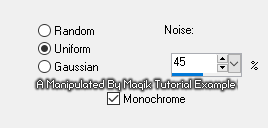
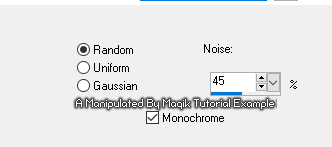
I then added noise to these layers:
Add a drop shadow to both:
5 0 20 6, black
Layer 3 & Layer 4-
Use manual colour correction to
change the colour of these layers
with #c0887b as the Source
& #c8c8c8 as the Target.
Change the blend mode of both to Soft Light at 100%.
Add a drop shadow to both:
5 0 20 6, black
Layer 5- Select all- float. Defloat. Delete.
Add a new layer & flood fill with
the ES Platinum 42 gradient:
Linear- Angle- 0, Repeats- 0.
Select none.
Layer 6- Add a drop shadow: 0 0 50 6, black
Layer 7- Add a drop shadow: 0 0 50 6, black
Layer 8- Select all- float. Defloat. Invert.
Paste your tube, resizing as needed.
Hit delete & select none.
Crop to canvas.
Add a drop shadow to the Layer 8 square-
0 0 50 6, black
Next duplicate your tube you just pasted.
Add a Gaussian Blur of 5.
Change the blend mode to Screen 60%.
Then add Jeux de lignes- Entrelacement at default settings.
Layer 9- Unhide & leave as is.
Layer 10- Add a drop shadow: 0 0 50 6, black
Layer 11- Lock transparency in your Layers Palette,
by clicking that little lock icon.
Flood fill with a Foreground/ Background gradient:
#5b616c- foreground colour
#242c36- background colour
Angle- 45, Repeats- 0.
*Make sure your flood fill settings are like mine:
Next on this layer- Select all- float. Defloat. Invert.
Paste your tube, resizing as needed,
making it about 20% smaller than the previous one.
Hit delete & select none.
Crop to canvas.
Add a drop shadow to the Layer 11 square-
0 0 50 6, black.
Duplicate your tube layer.
On the top one, add a Gaussian Blur of 5.
Change the blend mode to Screen 75%.
Change the blend mode of the bottom one
to Luminance (L) 100%.
Layer 12- Unhide & leave as is.
Layer 13, Layer 14 & Layer 15- Delete.
Layer 16- Select all- float. Defloat. Invert.
Paste your tube, resizing the same as you
did for the first one on the left side.
Hit delete & select none.
Crop to canvas.
Add a drop shadow to the Layer 16 square-
0 0 50 6, black
Next duplicate your tube you just pasted.
Add a Gaussian Blur of 5.
Change the blend mode to Screen 60%.
Then add Xero- Greyscaler at default settings.
*If using a grey-scaled tube, you can skip this step. Optional- on this top tube layer,
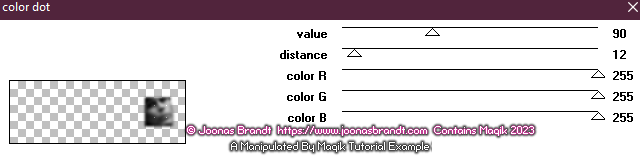
add Penta- Color Dot at these settings:
Layer 17- Unhide & rotate 90 Right.
Next, copy & paste your tube, resizing as needed.
Center it in the tag. Crop to canvas
to remove the excess that isn't showing.
Duplicate. Change the blend mode to
Screen- 100% on the top one
& on the bottom one, add the blinds effect:

Then, add a drop shadow- 0 0 65 10
The next seven steps are optional.I did this on my top example as well as
my Zindy example.
Duplicate the top tube & change the blend mode
to Normal & lock the transparency in you layers palette.
Duplicate this layer five times for a total of six.
Close all those five layers for now
& go back to your first locked layer.
Select your flood fill bucket tool.
Again, make sure your settings are like before-
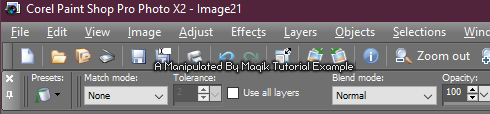
Match mode- None.
On that first locked layer, flood fill with #dcc0ab.
Change the blend mode to Multiply- 40%.
Open up the next locked layer.
Flood fill with #000040.
Change the blend mode to Exclusion- 60%.
Open up the next locked layer.
Flood fill with #b9d3f7.
Change the blend mode to Soft Light- 100%.
Open up the next locked layer.
Flood fill with #ecd5c5.
Change the blend mode to Soft Light- 60%.
Open up the next locked layer.
Flood fill with #000040.
Change the blend mode to Overlay- 50%.
Finally, open up the last locked layer.
Flood fill with #f7cde3.
Change the blend mode to Saturation (L)- 50%.
Next add a new layer.
On this layer, with your selection tool,
draw a square someplace on your tag:
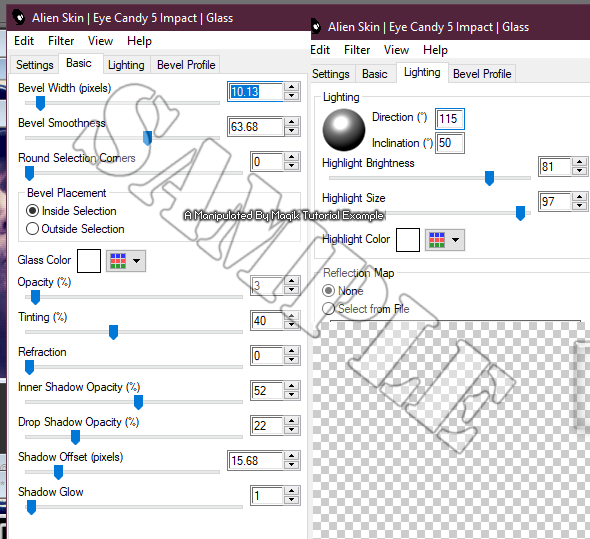
Next add a new layer & apply an Eye Candy 5 Impact- Glass effect:
Select none.
Next let's add a border.
Add a new Raster layer.
Flood fill with the ES Platinum 34 gradient-
Angle- 45, Repeats- 3 Invert- ticked.
Select all- Modify- Contract by 4. Delete.
Keep selected.
Add a new layer.
Selections- Modify- expand by 2.
Selections- Invert.
Flood fill this with #571c42.
Select none.
On this top darker border add some noise:
Repeat this noise effect.
Now is a good time to add your proper copyrights & watermarks.
Now, if you wish, add a
new layer & add some text or words.
I used lyrics from a song of Ville's for my top example.
For both my example tags, I used the Lalisa font in white.
I did change the opacity to 70% and
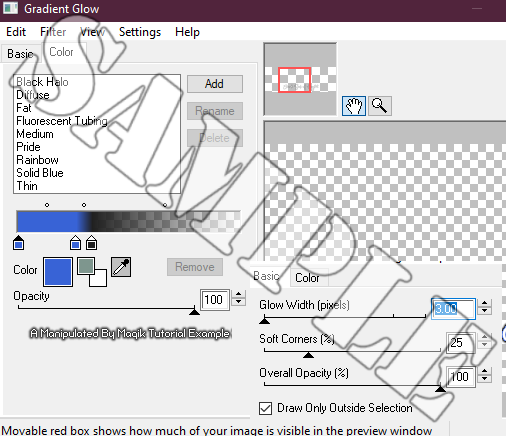
then added a Gradient Glow:
I did not add a drop shadow to my word art.
Next add your name.
I used the Love Hewits font in black.
Duplicate the name.
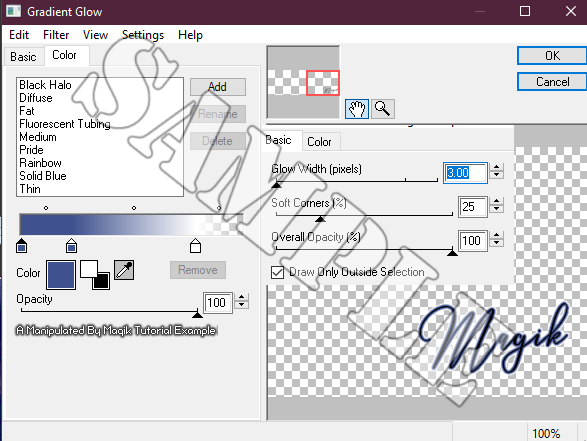
On the bottom layer, add a gradient glow:
Add your drop shadow:
0 0 65 10, #0928b5.
Finally, merge visible.
Save as a PNG & enjoy. =)
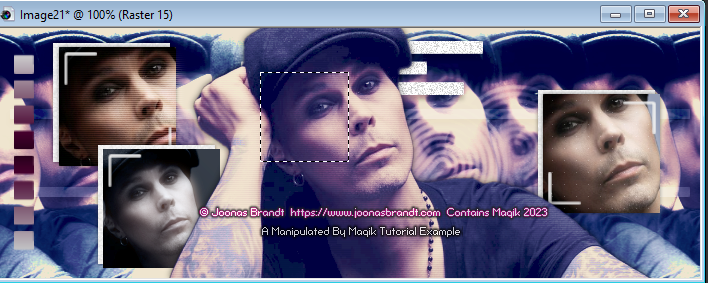
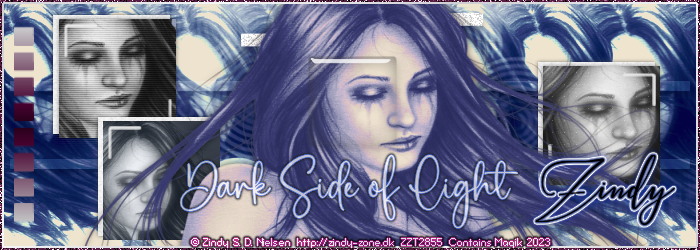
Here's two different versions using the artwork of Zindy.
The top one is the 'colourized' tube version, the second one is not:
Thank you for reading.

I hope you enjoyed trying this tutorial.
I'd love to see your results.
You can send them to me at:
MagikD[@]live.com
(remove the brackets in my email.)
Have a great day!
Stay safe & make good choices!

*hugz*


 Subject: No Scraps- Dark Side of Light
  Fri 26 May 2023 - 2:43
 )
)