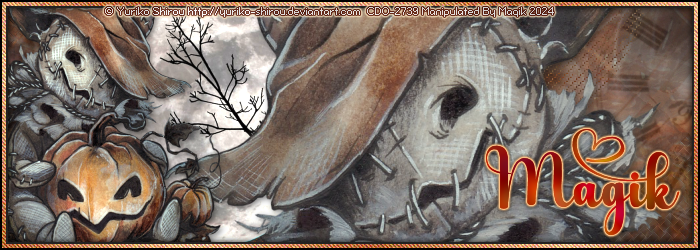
We have a Tagger task (challenge)
in our forum here where members
make a forum banner style tag
using a texture or texture pack I post & any other
materials, etc. that I might add to the challenge.
No scraps are ever used on these challenges,
thus making the tags more old-school style.

For the most recent task we have in our forum,
we had to use a texture of choice,
a banner mask of choice, and an element from a PNG pack.
I had fun making mine & decided to write it as a tutorial.
This tutorial can be used by other forums.
Please just link to this post & not copy/ paste my words.
Thank you.

It should be noted that the date of this post
is the creation date of the tag & the tutorial.

On with the tutorial:
This tutorial is borne from my own manipulated lil' mind.
Any similarity to any other tutorial(s) is purely coincidental.
This tutorial was written for those who have a working
knowledge of PSP and was written using PSP X2,
tho' any version should work.

Supplies Needed:
Texture: I'm using two from lollipop3103's
'#65:Halloween' texture pack
here.
*Leave a thank you for the textures.
Banner Mask: I'm using banner mask 1 from
Scraps Of Enchantment
here.
*Leave a thank you for the masks.
PNG Element: I'm using the moon (#14) from Evey-V's
'The Darkest Hour' PNG pack
here.
*Leave a thank you for the pack.
Tube or image: For my tag, I am using a tube
from Yuriko Shirou which I had bought at CDO.
Do NOT use any artwork unless you have a license to do so
& have purchased or obtained the tube legally.
Filters: Mura's Meister- Copies
Penta- Jeans (optional)
Eye Candy 4000- HSB Noise
Eye Candy 4000- Gradient Glow
Fonts: Pixel font of choice for watermarks/ copyrights.
Spooky for name(s).
This is a PTU font from Creative Design (Designer) at
Drop Shadows: 2 2 50 8, black
2 2 50 8, black/ -2 -2 50 8, black for border 3
0 0 50 4, black (for name)
Let's do this!

Open a new image- 700 X 250 px.
Flood fill with white.
Copy & paste your tube or image of choice
above the white background layer.
Resize 80% depending on what you're using.
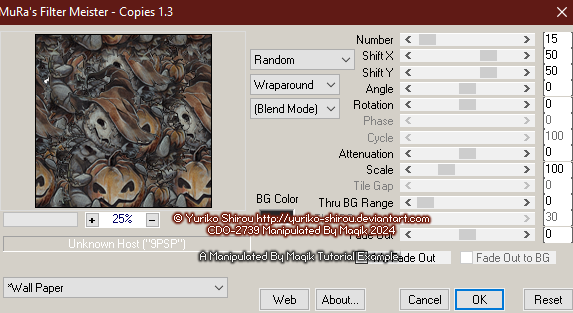
Next, apply Mura's Meister- Copies- Wall Paper:
Duplicate this layer.
On your duplicate, add a Gaussian Blur of 5.
Then change the blend mode on this layer to Screen at 100%.
Next, copy & paste a texture of choice.
I used texture #3.
I did not move this texture.
Crop to canvas.
Change the blend mode to Luminance (L) at 75%.
Copy & paste the same texture again.
Move the texture to where you want it.
I moved mine up so the branches were in my tag.
Change the blend mode of this one to Soft Light at 100%.
Crop to canvas again.
Next, copy & paste another texture of choice.
I used texture #1.
Apply your banner mask of choice to this layer:
Source Luminance.
Invert mask data Unchecked.
I used Banner Mask 1.
On your mask layer- merge group.
Next, copy & paste your PNG element of choice.
I am using the moon with the branches (14_Evey-V).
I did not resize mine.
Place to the left of the tag.
Duplicate it.
Change the blend mode of the top layer to Dodge at 50%.
Add a drop shadow to the bottom moon:
2 2 50 8, black
Now, copy & paste your tube or close up.
Resize if needed. (I did not resize mine).
Mirror & position to the right of the tag like shown in my tag.
Duplicate this layer.
On your duplicate, add a Gaussian Blur of 5.
Then change the blend mode on this layer to Screen at 50%.
Add a drop shadow to the bottom closeup/ tube layer:
2 2 50 8, black
Copy & paste your tube again.
Resize 40% or as needed.
Place this one on the left side.
Duplicate this layer.
On your duplicate, add a Gaussian Blur of 3.
Then change the blend mode on this layer to Dodge at 50%.
Add a drop shadow to the bottom tube layer:
2 2 50 8, black
Add a new layer. Name this border 3.
Flood fill this layer with #232120.
Selections- Select all- Modify- Contract by 8.
Delete. Select none.
On this layer, add a drop shadow:
2 2 50 8, black, Shadow on New Layer.
Go back to your border 3 layer.
Add another drop shadow:
-2 -2 50 8, black, Shadow on New Layer.
Add a new layer above your border 3 layer.
Name this one border 2.
Flood fill this layer with a foreground/ background gradient:
Angle- 45/ Repeats- 4
For mine I used the colors: #f1ba7e & #a02a02
but you can use what ever colors you wish.
Selections- Select all- Modify- Contract by 6.
Delete. Select none.
Add noise to this layer:
Uniform- 30- Monochrome Unchecked.
Then apply Penta- Jeans at default settings.
Add a new layer. Name this border 1.
Flood fill this layer with #000000.
Selections- Select all- Modify- Contract by 2.
Delete. Select none.
Now is a good time to add your proper copyrights & watermarks.

Next add your name.
I used the Spooky font with #a12700 for my text color.
Duplicate the name.
On the top name layer, I used Eye Candy 4000- HSB Noise at default settings.
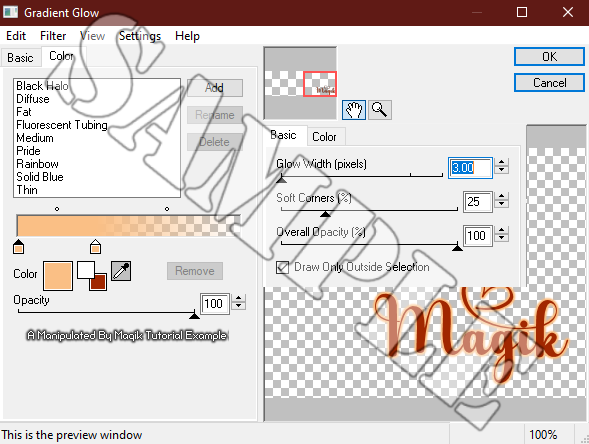
On the bottom layer, add a gradient glow:
Add a drop shadow to this name layer:
0 0 50 4, black
Finally, merge visible.
Save as a PNG & enjoy.

Thank you for reading.

I hope you enjoyed trying this tutorial.
I'd love to see your results.
You can send them to me at:
MagikD[@]live.com
(remove the brackets in my email.)
Have a great day!
Stay safe & make good choices!

*hugz*


 Subject: No Scraps- The Darkest Hour
  Fri 6 Sep 2024 - 15:58


