Original Post Date- 7/19/15, 3:04 AM Central Standard Time*The kit I used for this tutorial is no longer available for purchase.
-Magik 5/29/2021
This tutorial is borne from my own manipulated lil' mind.
Any similarity to any other tutorial(s) is purely coincidental.
This tutorial was written for those who have a working
knowledge of PSP and was written using PSP X2,
tho' any version should work.
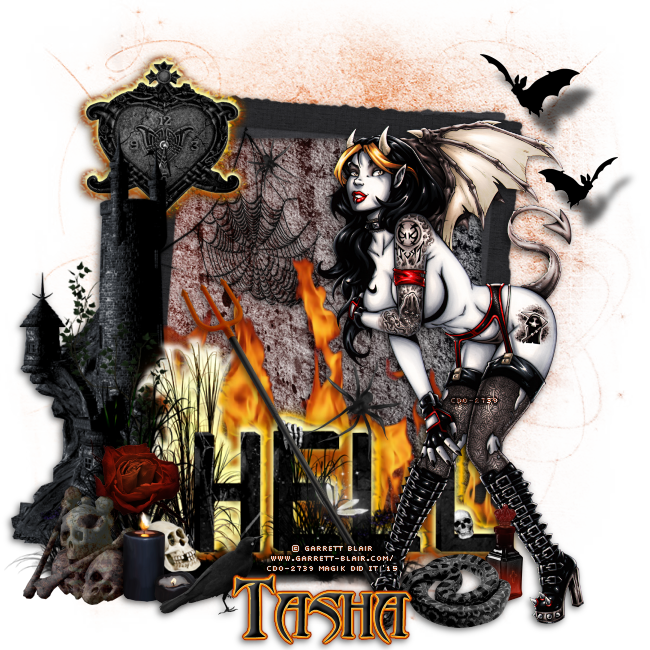
Supplies Needed: Scrapkit: I'm using the wicked Dragged To Hell kit
from Tasha's Playground.
*This kit is not available.Tube: I'm using the awesome artwork of Garrett Blair.
I had bought this at
CDO.
He has since left the store.
Do not use this artwork unless you have a license to do so
& have purchased the tube.
Mask: MPM_mask07 from Millies PSP Madness.
You can find this mask
here on her blog.
*
Make sure to leave a thank you for the mask.  Filters:
 Xero- Radiance
Eye Candy 4000- Gradient Glow
Font: Drakon
Drop shadows: 2 -2 60 10, black
20 15 65 10, black for the bats
Save your progress often.

Let's do this!

Open a new canvas 650 X 650 px.
Copy & paste paper06.
Apply the mask & merge group.
Copy & paste frame04.
Resize 85%.
With your magic wand, click inside the frame.
Selections- Modify- Expand by 4 px. Invert.
Copy & paste paper08.
Resize 65%.
Hit delete & select none.
Move the paper below your frame in layers palette.
Add a drop shadow to the frame.
Now we'll add some elements.
For each one, I added a drop shadow,
unless specified otherwise.
e11- Resize 40%.
Place in the upper left inside corner of frame.
Change the blend mode to Multiply.
e31- 40%
Place in the upper left of the frame.
e04- Resize 80%.
Place near the bottom.
e18- Mirror. Resize 75%.
Place on the lower left.
e76- 75%.
Place at the bottom of the frame.
e03- Resize 80%. Mirror.
Place in front of the castle.
NO drop shadow.
e16- 30%.
Place with the grass/ skull cluster
on the left.
e49- 35%.
Place on the left.
e20- 60%
Position in the lower center,
like my example.
Next, add your main tube.
Resize if needed.
Position her on the right, like my example.
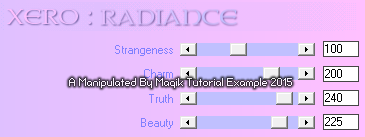
Apply Xero: Radiance at these settings:
Add a drop shadow to your tube.
Continue to add the following elements,
adding drop shadows to each:
e69- 25%.
Place off to the right, near your tube.
e39- Resize 27%.
Place in front of your tube.
e59- Duplicate.
Resize one 35%.
Mirror.
Place above the flames, near your tube.
Resize the other one 20%.
Place just above the spider web.
e27- 30%.
Place on the left, near the skulls.
e02- 15%.
Place with the other candle.
e15- Mirror.
Resize 30%.
Place on the left near the candles.
e46- Duplicate.
Resize one 20%.
Place on the upper right of tag.
Mirror the other one.
Resize 25%.
Place above the other bat on the upper right.
Add the following drop shadow to both:
20 15 65 10, black
Add any other elements if you prefer.
Crop & resize to your own liking.
Now add your proper copyrights & watermarks.
Now add your name in an off-black colour.
I used #2c2c2f.
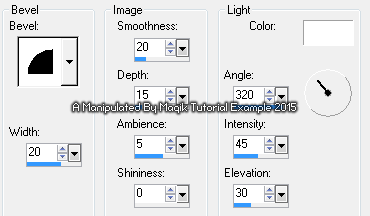
Next, add a bevel:
Add a gradient glow at these settings:
Then add your drop shadow to this layer,
using these settings:
2 -2 60 10, black.
Finally, merge visible, save as a PNG & enjoy.

I hope you enjoyed trying this tutorial.
I'd love to see your results.
You can send them to me at:
MagikD[@]live.com
(remove the brackets in my email.)
*hugz*
*Originally re-posted Nov 7th 2019 at http://himaddicts.spruz.com/
**Edited & updated by Magik on 29 May, 2021


 Subject: PTU Tutorial- Hell's Angel
  Sat 29 May 2021 - 8:42


