Original Post Date- 5/28/12, 1:57 AM Central Standard Time*The template I used for this tutorial is no longer available,
however, if you had download it from Tamie in the past,
you still will be able to try this.  -Magik 5/20/2021
This tutorial is borne from my own manipulated lil' mind.
Any similarity to any other tutorial(s) is purely coincidental.
This tutorial was written for those who have a working knowledge of PSP
and was written using PSP XI, tho' any version
should work.
Supplies Needed: Scrapkit: Cyber Cat from me.
This was a PTU kit, but you can grab the kit from my post, here:
PTU Now FTU Cyber CatTube: I'm using the sexy artwork of Arthur Crowe.
I had bought this from Arthur Crowe's Factory.
Do NOT use this artwork unless you have a license to do so
& have purchased the tube.
Template: Template 181 from Tamie at
Addictive Pleasures.
*Unfortunately the template is no longer available for download.Filters: Xero- Radiance
Xero- Porcelain
Eye Candy 4000 HSB Noise
Eye Candy 4000 Gradient Glow
Font: Feel Script
Drop shadow used in this tutorial is 2 4 48 4, black.
Let's do this!
Save your progress often.
Open up the template.
Duplicate it & close original.
Delete the credit layer at the top.
Resize the template so its 650 X 650 px.
Then change the canvas size to 650 X 665 px.
Working from the bottom layer of the template, up:
Delete the white background layer at the bottom.
Raster 4- Select all- float. Defloat- Invert.
Delete this layer & paste paper 14.
Hit delete & select none.
Crop to canvas & add a drop shadow.
Raster 7- Select all- float. Defloat- Invert.
Delete this layer & paste paper 11.
Hit delete & select none.
Crop to canvas & add a drop shadow.
Raster 8- Select all- float. Defloat- Invert.
Delete this layer & paste paper 7, resized 80%.
Hit delete & select none.
Crop to canvas.
Raster 3- Select all- float. Defloat- Invert.
Delete this layer & paste paper 3.
Hit delete & select none.
Crop to canvas & add a drop shadow.
Raster 5- Select all- float. Defloat- Invert.
Delete this layer & paste paper 8.
Hit delete & select none.
Crop to canvas.
Raster 9- Select all- float. Defloat- Invert.
Delete this layer & paste paper 20.
Hit delete & select none.
Crop to canvas.
Raster 2- Select all- float. Defloat- Invert.
Delete this layer & paste paper 24, resized 70%.
Hit delete & select none.
Crop to canvas.
Copy of Raster 2- Select all- float. Defloat- Invert.
Delete this layer & paste paper 21.
Hit delete & select none.
Crop to canvas.
Raster 6- Select all- float. Defloat- Invert.
Delete this layer & paste paper 17.
Hit delete & keep selected.
Copy & paste your close up.
Hit delete & select none.
Crop to canvas.
On your closeup layer, apply Xero- radiance at these settings:
Bring the opacity down to about 80%.
Add a drop shadow.
Raster 10- use your manual color correction tool to adjust
it to the light yellow from the colour palette in the kit.
Add noise- Uniform/ Monochrome/ 75%.
Add a drop shadow.
Raster 11- Select all- float. Defloat- Invert.
Delete this layer & paste paper 4, resized 60%.
Hit delete & keep selected.
Copy & paste your close up.
Resize to about 60%.
Hit delete & select none.
Crop to canvas.
On your closeup layer, apply Xero- Porcelain at these settings:
Add your drop shadow.
Raster 12- use your manual color correction tool to adjust it
to the darker red from my colour palette.
Add noise- Uniform/ Monochrome/ 75%.
Add a drop shadow.
Next, copy & paste your main tube.
Resize as needed (about 57%)
so she fits on the tag.
Position her over to the left.
Apply Xero- Radiance at the same settings you used before.
Then apply Xero- Porcelain (same settings)
& add a drop shadow.
Now it's time for some elements.
For each one that is resized,
sharpen before adding your drop shadow.
Copy & paste the wire.
Resize 90%.
Position up at the top.
Duplicate & flip.
Merge down.
Right click in the layers & send to bottom.
Add a drop shadow.
Back at the top in your layers, add the skullNflames.
Resize 70%.
Position down at the bottom of the template.
Drag below your rotate left square in layers palette.
Sharpen & add your drop shadow.
flower 2- Mirror. Resize 35%.
Place on the top right of the tag.
Move below your main tube in the layers palette.
lips 2- Resize 75%.
Rotate 12 right & sharpen.
Place at the top right.
Add your drop shadow.
kitty- Mirror. Resize 63%.
Place this little guy over on the left.
Add your drop shadow.
heart charm 1- Resize 45%.
Position off center to the left.
Sharpen & add a drop shadow.
roses- Resize 60%.
Place near the top left.
Sharpen & drop shadow.
skull rose- Mirror.
Resize 60%.
Sharpen.
Place on the left like my example.
Add your drop shadow.
butterfly 1- Resize 45%.
Rotate 17 right & sharpen.
When adding your drop shadow use 10, 4 48 4, black.
Place on the top left.
cupcake 1- Resize 37%.
Place by the kitty.
Add your drop shadow.
* Make sure you change the settings back. star lolli- Resize 57%.
Rotate 17 left.
Place behind the cupcake.
Sharpen & drop shadow.
Add any other elements, if you choose.
Now, crop/ resize your tag to your own preferences.
Then, add your proper copyrights & watermarks.
Now add your name.
Duplicate it.
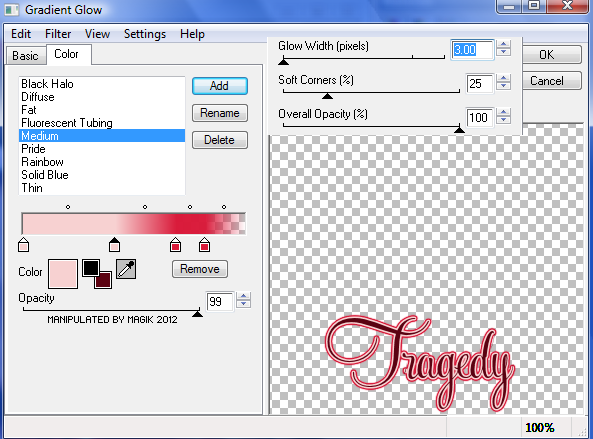
On the bottom layer, add a gradient glow:
Then apply Eye Candy 400 HSB Noise at default settings
to the glowed layer & add your drop shadow.
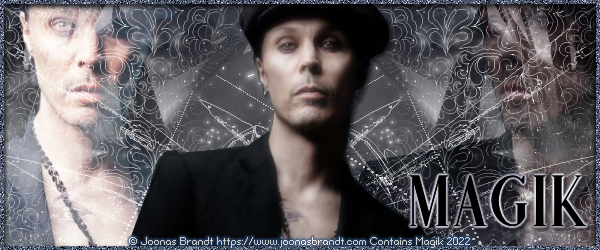
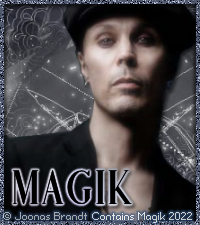
Merge visible & save as a PNG & you're done.
I hope you enjoyed this tutorial.
I'd love to see your results.
*hugz*


 Subject: FTU- Cyber Cat (This was once a PTU Tutorial)
  Thu 20 May 2021 - 6:27