Original Post Date- 1/31/12, 2:38 AM Central Standard Time
This tutorial is borne from my own manipulated lil' mind.
Any similarity to any other tutorial(s) is purely coincidental.
This tutorial was written for those who have a working knowledge of PSP.
This tutorial was written using PSP XI, tho' any version should work.
Supplies Needed:
Tube of choice. I am using the artwork of Verymany.
This is a prepaid commission tube & is an exclusive from SATC.
Do NOT use this artwork unless you have a license
to do so & have purchased the tube.
Scrapkit is Pink Candy Valentine.
This is a free to use kit & can be found by visiting Designs By Vaybs.
Find the kit
here.
Template: CBN_Template 159 from Deb at
Creative By Nature.
*If the blog is closed, you can grab the template from me on this post.
But PLEASE check the Creative By Nature blog first. 
Mask: Heart/Love Masks which can be found at
Creative Misfits Blog.
I am using KyLie-M4 mask from the pack.
* Show the love when downloading the supplies. 
Font: Font of choice. I'm using Fiolex Girls.
Filters: Xenofex 2: Constellation
Xero: Simplicity
Xero: Soft Vignette
Xero: Radiance
Eye Candy 4000 Gradient Glow (for text & parts of temp)
Let's do this!
Save your progress often.
Drop shadow used for this tutorial is 1 4 40 4.
Each time I add my papers, I crop my tag to canvas
(surround the whole tag when cropping)
before adding gradient glows
or drop shadows to eliminate any 'phantom shadows'
showing up on the edges.

Open up the template. Duplicate it & close original.
Delete the credit layer at the top.
Working from the bottom of the template, up:
Add a new layer.
Send it to the bottom in the layers palette.
Flood fill white.
Copy & paste DBV_PCVpaper (5)
Apply your mask & merge group.
Apply Xenofex 2- Constellation to the mask at these settings:
For Layer 11: Selections- select all.
Float- defloat- Invert.
Delete layer in palette.
Copy & paste DBV_PCVpaper (10) resized 80%.
Hit delete on your keyboard.
Select none.
For Layer 10: Selections- select all.
Float- defloat- Invert.
Delete layer in palette.
Copy & paste DBV_PCVpaper (3).
Hit delete on your keyboard.
Select none.
For Layer 9: Selections- select all.
Float- defloat- Add a new layer.
Delete layer 9 in palette.
On your new layer, flood fill with the following gradient:
#ffc7e2- foreground #a73d6b- background
Linear/ angel- 45 Repeats-1.
Select none.
Then apply Xero- Simplicity at these settings:
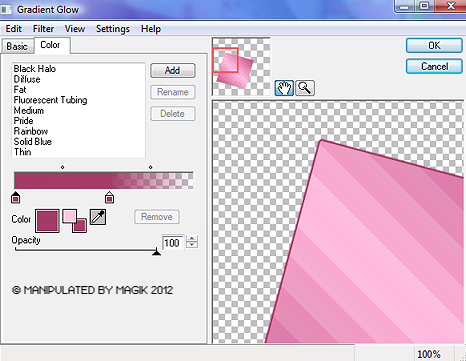
Then add a gradient glow set at 3:
Next, copy & paste DBV_PCVpaper (12) above layer 8.
Resize 60% & rotate right 15.
Position it above the square in layer 8.
Then on layer 8, Selections- select all.
Float- defloat- Invert.
Delete layer in palette.
Select your rotated paper you just added.
Hit delete on your keyboard. Select none.
Next, delete layer 7.
For Layer 6: Selections- select all.
Float- defloat- Invert.
Delete layer in palette.
Copy & paste DBV_PCVpaper (2) resized 80%.
Hit delete on your keyboard.
Select none.
Change the colour of layer 5 (frame) to a pale light pink.
Add noise- Uniform/ Monochrome/ 75%.
For Layer 4: Selections- select all.
Float- defloat- Add a new layer.
Delete layer 4 in palette.
On your new layer, flood fill with the following gradient:
#ffffff- foreground #eb70bb- background Linear/ angle 36/ repeats 6.
Select none.
Then apply Xero: Soft Vignette:
Add noise at same setting as other frame to layer 3 (heart frame).
Crop to canvas & go back & add gradient glows &/ or drop shadows
of your choice to the layers except the heart frame layer.
Next, click inside your heart frame with the magic wand.
Selections- Modify- Expand by 2. Invert.
Copy & paste your closeup or tube.
Resize as needed. Hit delete.
Move tube below frame layer. Duplicate.
On bottom layer change blend mode to Luminance (L).
Add a Gaussian blur of 3 to the top layer & set blend mode to Screen.
Add a drop shadow to the bottom closeup.
You can now add a drop shadow to your heart frame if you prefer.
Add your main tube.
Resize & position to the right side as shown in the tag.
Apply Xero: Radiance at these settings:
Then add your drop shadow.
Next, let's start adding some elements.
After resizing, sharpen & add a drop shadow to the following
DBV_PCVelement (38) resize 65%
DBV_PCVelement (26) 40%
DBV_PCVelement (11)
DBV_PCVelement (29) 35%
For the word art, use the magic wand to select all of the word 'cupid',
then add some noise to it.
Then select the words Valentine's Day & slightly change the colour to a darker pink.
For mine, I did delete the drop shadow layer for the word art & added my own.
Next crop &/ or resize to your preference.
Then add your copyrights & watermark.
Next type out your name.
Duplicate it.
On the top layer, add a bevel:
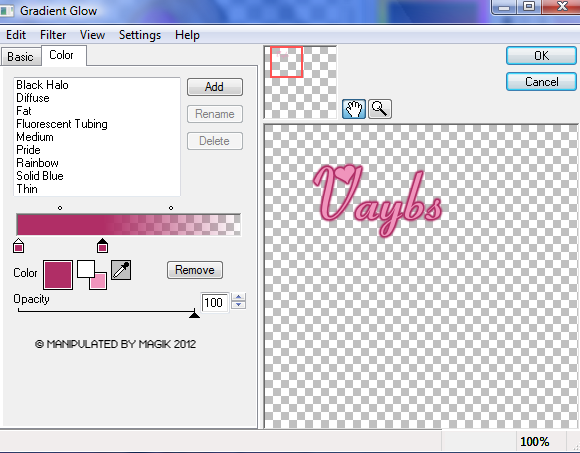
On the bottom add a gradient glow, set at 3:
Add drop shadow to this bottom layer.
Delete the white layer at the bottom, merge visible & you're done.
I hope you enjoyed this tutorial & creating your tag.
I'd love to see any results any of you have trying this.

*hugz*


 Subject: FTU- Valentines is Cancelled
  Sat 15 May 2021 - 5:57


