Original Post Date- 5/18/12, 10:51 PM Central Standard Time
This tutorial is borne from my own manipulated lil' mind.
Any similarity to any other tutorial(s) is purely coincidental.
This tutorial was written for those who have a working knowledge of PSP
and was written using PSP XI, tho' any version should work.
Supplies Needed:
Scrapkit: Emo Glam from yours truly (me).
This once was a PTU kit, but you can get free now
here.
 Tube:
Tube: EMOlution 3 by the very talented Verymany.
You can find this & other amazing tubes at
PFD.
Do NOT use this artwork unless you have a license to do so
& have purchased the tube.
Template: Template 161 from Kristen at
Toxic Desirez.
You can grab the template
here.
* Leave some love when downloading the template. Optional: a pic of your favourite album art from your favourite band.
Filters: Xero- Radiance
Eye Candy 5 Impact- Chrome.
Eye Candy 4000 Gradient Glow
Font: Morpheus
Drop shadow used in this tutorial is 0 0 80 10, black.
Let's do this!
Save your progress often.
Open up the template.
Duplicate it & close original.
Delete the credit layer at the top.
Resize the template so its 650 px in width.
Working from the bottom layer of the template, up:
Star Background-
Using your manual colour correction,
change to one of the colours in the palette of the kit,
or another that matches your tube.
Left & Right Glitter Circles- leave as is.
Add a drop shadow to both.
Left Circle- Select all- float. Defloat- Invert.
Delete this layer & paste paper 3, resized 70%.
Hit delete & select none.
Right Circle- Select all- float. Defloat- Invert.
Delete this layer & paste paper 5, resized 70%.
Hit delete & select none.
Glitter Rectangle- Using your manual color correction,
change the colour to your own preferences.
Apply noise to it- Uniform/ Monochrome/ 75%.
Rectangle- Select all- float. Defloat- Invert.
Delete this layer & paste paper 11, resized 80%.
Hit delete & select none.
Right & Left Dotted Rectangles-
Use the manual color correction tool
to change them, if you prefer.
Do the same for the Glitter Stars.
Go over the glitter stars with noise at the same settings as the glitter rec.
Glitter Oval- add noise to it at the same settings as above.
Add a drop shadow.
Oval- Select all- float. Defloat- Invert.
Delete this layer & paste paper 16, resized 80%.
Hit delete & select none.
Right & Left Glitter Rectangle-
Add a drop shadow.
Right Rectangle- Select all- float. Defloat- Invert.
Delete this layer & paste paper 1, resized 70%.
Hit delete & select none.
Left Rectangle- Select all- float. Defloat- Invert.
Delete this layer & paste paper 1, resized 70%.
Hit delete & select none.
Circle 1- Select all- float. Defloat- Invert.
Delete this layer & paste paper 21.
Slide it down a bit
so the brush strokes don't show up in the circle.
Hit delete & select none.
Crop to canvas & drop shadow.
Glitter Circle- leave as is.
Circle 2- Select all- float. Defloat- Invert.
Delete this layer & paste paper 12, resized 70%.
Hit delete & select none.
Change the blend mode of the skull to Screen at 50%.
Use your colour correction tool to change the pixel words if you prefer.
Next, copy & paste your main tube.
Resize as needed so she fits on the tag.
Apply Xero- Radiance at these settings:
Position just off to the left a bit & add a drop shadow.
Now let's add some elements:
Ribbon 1- Resize 80%.
Sharpen.
Move below the tube.
Add a drop shadow.
Phone- Resize 50%.
Rotate 18 right.
Drag below the ribbon.
Position over on the right.
Add a drop shadow.
Parfum- Resize 45%.
Sharpen.
Move above the ribbon.
Add a drop shadow.
Polish 2- Resize 33%.
Position by the parfum.
Sharpen & drop shadow.
Compact- Resize 40%.
Place to the right of the polish.
Sharpen & add a drop shadow.
Lipstick 1-. Mirror.
Resize 33%.
Rotate 80 right.
Place in front of the parfum & polish,
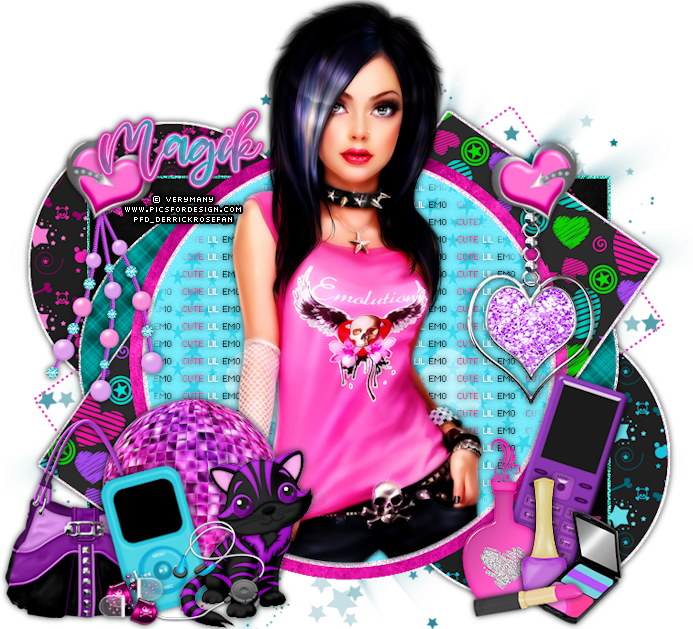
on the compact like my example.
Sharpen & add a drop shadow.
Dangle 2- Resize 60%.
Position on the top left.
Sharpen & add a drop shadow.
Chrome heart 1- Resize 37%.
Rotate 18 right.
Place on the upper right.
Sharpen & add a drop shadow.
Ipod- Resize 45%.
Rotate 15 left.
Next, copy & paste the image of choice for the album art.
Rotate 15 left.
Now, back on the ipod,
click inside the black screen with your magic wand.
Modify- Contract by 1. Invert.
Resize your album artwork as needed.
Hit delete & select none.
Sharpen the album artwork.
Back on the ipod, sharpen & add a drop shadow.
Earbuds- Resize 55%.
Place them on the ipod like in my example.
Sharpen & add a drop shadow.
Pills 2- Resize 35%.
Position on the left by the ipod.
Sharpen & add a drop shadow.
Add any other elements if you prefer.
Now, crop/ resize your tag to your own preferences.
Then, add your proper copyrights & watermarks.
Next, add your name.
Duplicate it.
On the top one, apply EC 5 Impact- Chrome- Platinum
at default settings.
Use the manual color correction tool to add some colour to it.
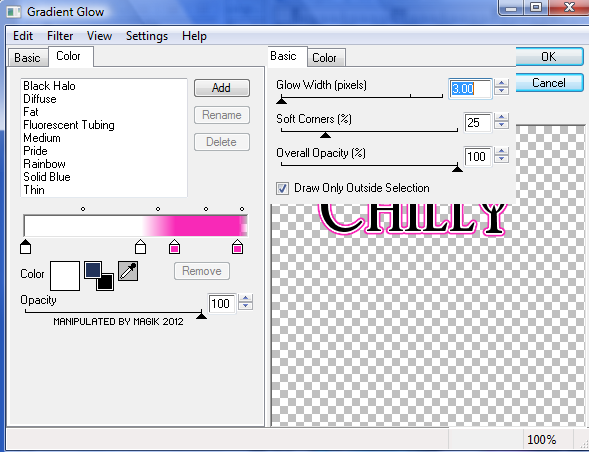
On the bottom layer, add a gradient glow:
Add your drop shadow.
Delete the white background layer at the bottom.
Merge visible & save as a PNG & you're done.
I hope you enjoyed this tutorial.
I love seeing your results.
*hugz*


 Subject: FTU- Emo Cutie (This was previously a PTU Tut)
  Wed 19 May 2021 - 23:40


