Original Post Date- 7/12/12, 6:43 PM Central Standard Time
This is a simple/ basic tutorial on how to make
glitter & 'satin' styles.
These are methods I've taught myself,
so feel free to play around with the settings
in your program to get a style 'look' you like best. 
This tutorial is borne from my own manipulated lil' mind.
Any similarity to any other tutorial(s) is purely coincidental.
This tutorial was written for those who have a working
knowledge of Photoshop & was written using PS CS3,
tho' any version
should work.
To make Glitter Styles:Supplies Needed: Art Rage to make your glitter sheets
or you can grab my basic silver ones
here.
There's 4 different sheets in my supplies
in different hues of 'silver' (or grey).
They're 800 x 800 px in size at 300 dpi.
All are already seamless for tiling,
so they're ready to use, recolour, etc.
* Before I begin, I'm assuming you have already made yourown glitter sheets, or are using the ones I'm giving you-colourising them, etc to your own preferences.In Photoshop, open your glitter sheet(s).
For each one:
Select- All.
Then go to Edit & click Define Pattern.
Name it (or use the default name that's there)
& click ok.
When finished loading your glitter sheet(s),
close them since we won't need them any more.
Now, open a new image, 300 X 300 px, transparent.
Use your shape tool & pick out a shape you like.
I'm using the rounded rectangle shape for mine.
Next, draw out your shape in your canvas.
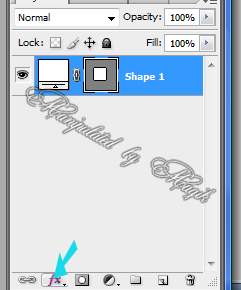
Then at the bottom in your layers menu (palette),
click on the Fx at the bottom like shown here:
Select the Pattern Overlay option:
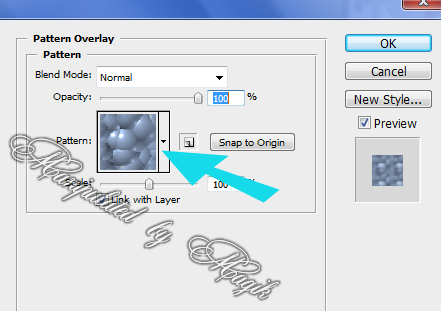
A screen like this will come up:
Now, click the arrow next to the box that says 'Pattern'
& find your glitter pattern you loaded:
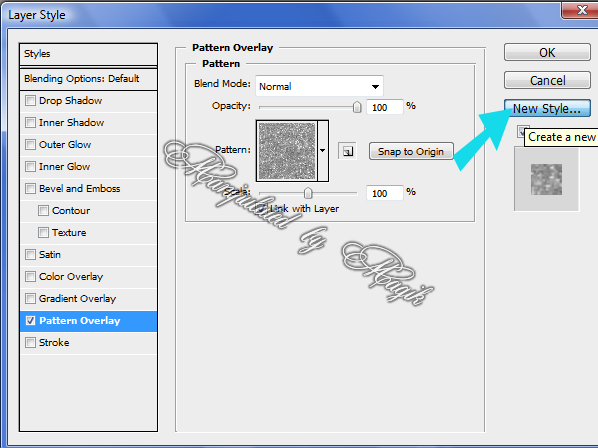
Then click where it says 'New Style':
Another box will come up.
Name the style & click OK.
Then, click ok again in the top right of the Fx box.
Your style should now be loaded.
(Now, if you want to save the shape you applied the glitter to
for a preview, add a new blank layer & merge visible.)
Also, if you wish to add more styles (before we save them),
you can go to edit- Stepbackward to undo the glitter
& add your next one for saving.
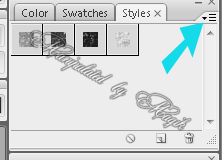
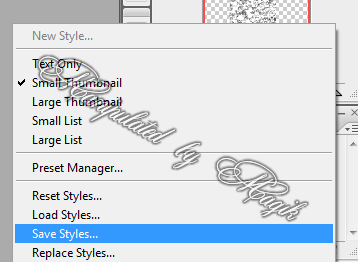
Now, to save your glitter style(s) you made,
click the little arrow like I have shown here:
Then click save styles.
Give them a name & click save.
You now know an easy-peasy way to make glitter styles.
 To make Satin Styles:* No materials are needed for this one
.
Now, this is how I make my satin styles.
As before, draw out your shape on a transparent canvas.
Colour isn't important yet, since we'll be adding colour with the Fx tool.
As before with the glitter,
click on the Fx at the bottom.
This time, select Bevel & Emboss:
A box should come up.
These are the settings I use in the top part of the box
to get the effect I have:
You can play with these settings to
get a different effect if you prefer.
On the bottom half of this box,
where it says shadow mode,
keep it on Multiply,
but select your colour of choice.
Now, click on Color Overlay:
In the blend mode, add the same color as you did
for the Bevel & Emboss settings.
Click New Style over on the right & name it.
Click ok.
Then, click ok again in the top right of the Fx box.
Your style should now be loaded.
To save the style, do the same as you did when saving
the glitter style(s) & you're done.
If you want to create more,
double click the Fx in your layers palette
(on the same layer as your shape)
and change the colour settings, click New Style,
name it & click ok.
Also, like with the glitter styles, if wanting to save your shape
for a preview, add a new blank layer & merge visible.
I hope this tutorial is useful for some of you.
Have fun creating some sassy PS styles.

*hugz*


 Subject: Tut- Making Styles in Photoshop
  Thu 20 May 2021 - 22:35