Original Post Date- 9/26/12, 5:12 PM Central Standard Time
* The kit I used for this tutorial
may or may not be available.
When I click to download nothing is happening.
I'm going to guess that maybe Leah's bandwidth is exceeded atm.
So, I am going to keep the kit linked for now,
but I am going to have this tutorial in my N/A board,
just in case. 
-Magik 5/22/2021
This tutorial is borne from my own manipulated lil' mind.
Any similarity to any other tutorial(s) is purely coincidental.
This tutorial was written for those who have a working
knowledge of PSP and was written using PSP XI,
tho' any version
should work.
Supplies Needed: Scrapkit: I'm using a FTU kit named Check Your Chi Chis
from Leah of Amy & Leah's Gimptastic Tuts.
This is part of an awesome FTU collab for Breast Cancer Awareness.
You can find this on their blog,
here.
Tube: I'm using the stunning art work of Jamie Kidd.
This is an exclusive tube for those who donated for the
Taking Back PSP fundraiser in 2012.
Do NOT use this artwork unless you have a license
to do so & had donated for the tube.
Template: IPinkICan from Tonya
on the Creative Misfits blog,
here.
*
Leave some love when downloading the kit & template.
Filters: MuRa Meister's Copies
Xero- Radiance
Eye Candy 4000- Gradient Glow
Font: LainieDay
Drop shadow: 0 3 50 5, black.
Save your progress often.

Let's do this!

Open up the template.
Duplicate it & close original.
Delete the credit layer at the top.
Working from the bottom layer of the template, up:
Circle 1-
Select all- float. Defloat- Invert.
Delete this layer & paste paper1, resized 80%.
Hit delete & select none.
Duplicate, mirror & flip.
Add a drop shadow to both.
Delete Circle 2 layer.
Smaller Rectangle 1-
Select all- float. Defloat- Invert.
Delete this layer & paste paper10, resized 80%.
Hit delete & select none.
Crop to canvas.
Drop shadow.
Smaller Rectangle 2-
Select all- float. Defloat- Invert.
Delete this layer & paste paper10, resized 80%.
Hit delete & select none.
Crop to canvas.
Drop shadow.
Rectangle Background-
Add a drop shadow.
Copy & paste wordart.
Resize 35%.
Apply Mura Meister Copies at these settings.
Rectangle-
Select all- float. Defloat- Invert.
Delete this layer & paste paper9.
Hit delete.
Keep selected & hit delete on your word art layer.
Select none.
Crop to canvas.
Dotted Rectangle-
Use your manual color correction
to change to a darker pink, or a colour from your tube.
wordart-
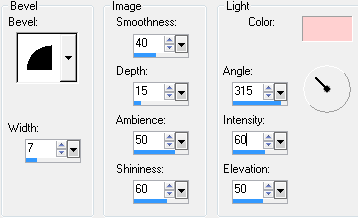
Add a bevel:
Then a gradient glow:
Add a drop shadow.
Next, add your main tube, resizing as needed.
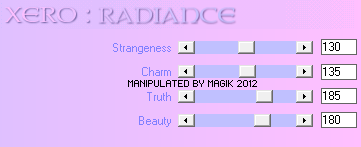
Apply Xero- Radiance at these settings:
Then add your drop shadow.
Next we'll add some elements.
For each one I added, I sharpened & added
a drop shadow to, unless specified otherwise.
deco 2- 110%.
Place in the center of the tag.
Move to the bottom in layers palette.
Use your lasso & select the biggest butterfly
in the butterfly scatter.
Copy & paste in the upper right corner.
Rotate 40 left.
Drop shadow used- 3 6 50 5, black.
butterfly scatter- 85%.
Place on right of tag.
Drop shadow used- 6 3 50 5, black.
Add any other elements, if you prefer at this time.
Now, crop/ resize your tag to your own preferences.
Then, add your proper copyrights & watermarks.
Now add your name in the center of the rectangle.
Add a drop shadow at these settings:
6 4 100 5, white
Now, delete the white background.
Merge visible & save as a PNG.
Enjoy your new tag.

*hugz*


 Subject: FTU- I Pink I Can
  Sat 22 May 2021 - 20:23


