This will be a very simple tutorial
to show you how to make an animated glitter.
This tutorial is for those
who have never used Animation Shop
& is a beginner tutorial to give you a 'feel' of animating.

Please do NOT repost this tutorial.
You may link to it, however.

Also, do NOT steal my screen shots.
Thank you.

This tutorial is borne from my own manipulated lil' mind.
Any similarity to any other tutorial(s) is purely coincidental.
This tutorial was written for those who have a working
knowledge of PSP and was written using PSP X2,
and Jasc Animation Shop.
Supplies Needed:
This is a simple little box that we'll add color to & use
to give you a feel of a simple glitter animation.
*There is a PSD & PSP version in the zip.
PSP- Any version should work.
Jasc Animation Shop
Let's do this!

Open the little template in PSP.
On the base to flood fill layer,
either flood fill with a color of choice
or you can use the Manual Color Correction tool
to change the black to a color of choice.
If using the Manual Color Correction tool,
the Source color is #000000.
For my examples, I am using a dark color
& a light color for two different glitters.
I did make two versions of the lighter colored one.
Once you have this little square colored to your choosing,
in Layers palette, duplicate it twice so you have three.
Close the top two colored layers for now.
On the bottom one, making sure it's your 'Active' layer,
go to Adjust- Add Noise.
You can use any 'number' amount.
I typically start with 40.
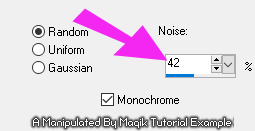
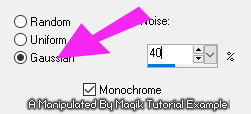
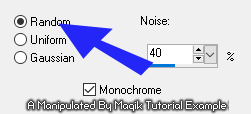
On my blue example, these were the settings I used:
*Note- since my blue is a darker color,
I selected 'Random' for my noise.
You can use the other two settings,
but I personally use Random for any darker
colors I am adding noise to, to make the
'glitter effect' more noticeable.
Close this layer in your layers palette.
Open the second layer above this one
& make sure it is active.
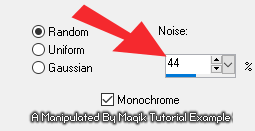
Again, go to Adjust- Add Noise.
Only change your Noise amount number,
increasing it by two like my example:
Close this second layer in your layers palette.
Open the third/ top layer above this one
& make sure it is active.
Again, go to Adjust- Add Noise.
Only change your Noise amount number,
increasing it by two like my example:
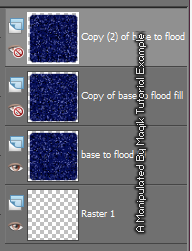
Close this layer & reopen your bottom/ first glitter layer.
You're layer palette should look like mine:
Now open up your Animation Shop.
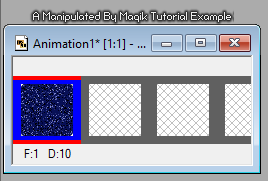
In PSP, making sure your open glitter layer is active,
copy this & paste this into Animation Shop.
*I just copied the layer for mine
& did not 'copy merged' for my examples.
It should look like this in A.S.:
Back in PSP, close your bottom glitter layer
& open the second/ middle one.
Making sure this glitter layer is active,
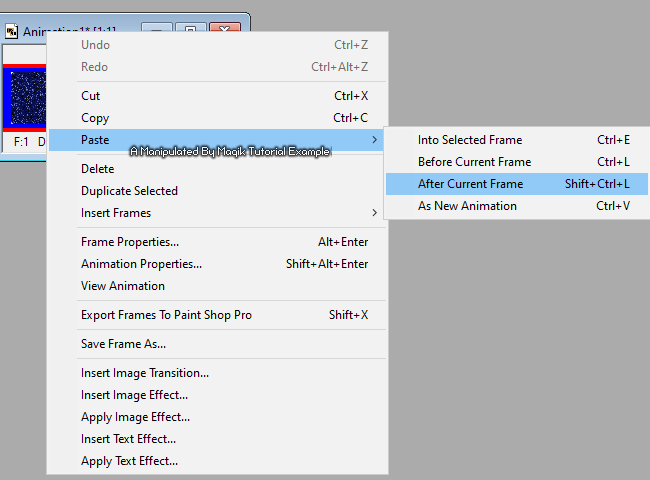
copy this one & paste it into Animation Shop
as shown in my example-
Paste- After Current Frame:
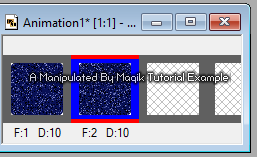
It should now look like this in A.S.:
Back in PSP, close your middle glitter layer
& open the third/ top one.
Making sure this glitter layer is active,
copy this one & paste it into Animation Shop
like my example again
Paste- After Current Frame like above.
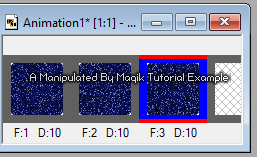
It should now look like this in A.S.:
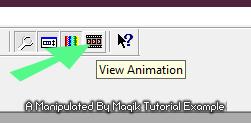
Now, in A.S., click the little icon
next to the Help icon in your tool bar like shown:
This will 'play' your animation so you can see
what it looks like:
From here, you can go to file & save as a .gif.
For my first mauve glitter,
I changed the noise setting to Gaussian:
& this is how it looks:
For my second mauve glitter,
I changed the noise setting to Random :
& this is how it looks:
Feel free to experiment with different noise settings.
*It should also be noted that you can create
more than just three frames for a glitter animation.
You would just have 'X' amount of colored layers
& increase the noise amount of each layer by two.
Then copy each one after each other in A.S.
Thank you for reading.

I hope you enjoyed trying this tutorial.
I'd love to see your results.
You can send them to me at:
MagikD[@]live.com
(remove the brackets in my email.)
Have a great day!
Stay safe & make good choices!

*hugz*


 Subject: Simple Glitter Animation
  Mon 6 Nov 2023 - 0:08