Original Post Date- 1/14/12, 1:51 AM Central Standard Time
This tutorial is borne from my own manipulated lil' mind.
Any similarity to any other tutorial(s) is purely coincidental.
This tutorial was written for those who have a working knowledge of PSP.
This tutorial was written using PSP XI, tho' any version should work.
Supplies Needed:
Music that gets your mojo going, since this one is a bit lengthy.
May I recommend HIM?

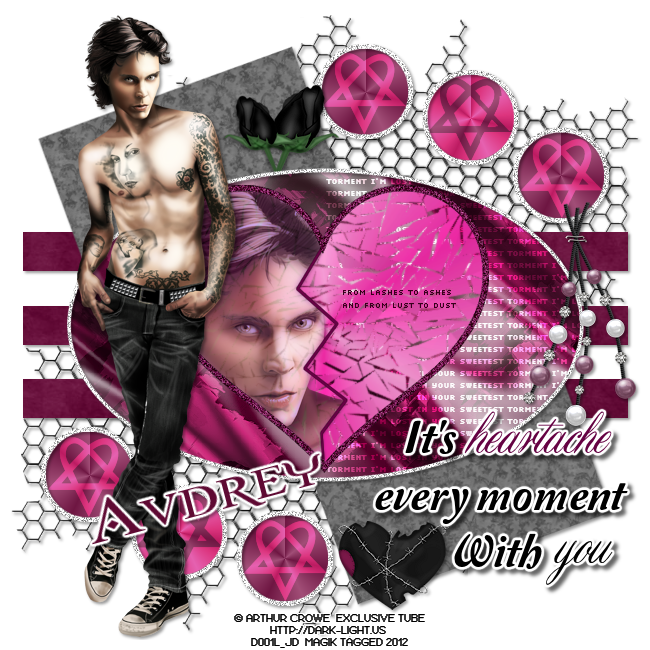
Tube of choice. I am using a tube of Ville Valo from Arthur Crowe.
This tube was available exclusively at my Dark Light HIM fan site (in the forum).
Any other tube will work nicely for this tutorial, also.

Scrapkit is Gothic Love. This is a free to use kit & can be found by visiting Purple's blog here.
Show the love when downloading the kit.
*This kit is no longer available.
You may be able to use another kit that is 'Goth'- themed.
Template: Heartache Every Moment Temp from me,
here.
Other supplies (optional): My image pack for brushes
here.
There is a PSP, PSD & PNG avail. depending on what program you use.
* This image pack was created by me a few years ago for using as brushes
in making Live Journal icons, so they're not too big.
Font: Font of choice
Filters: Tramages- Pool Shadow
Tramages- Metal Peacocks
Xenofex 2- Shatter
Xero- Porcelain
Xero- Radiance
Eye Candy 4000 Gradient Glow (optional for text & parts of temp)
Let's do this!
Save your progress often.
Drop shadow used for this tutorial is 2 2 40 4.
Each time I add my papers, I crop my tag to canvas
(surround the whole tag when cropping) before adding gradient glows
or drop shadows to eliminate any 'phantom shadows' showing up on the edges.

Open up the image pack for brushes.
You can either load the ones you wish to use into your program
or colourise them & copy/ paste them when working on this tag.
Open up the template. Duplicate it & close original.
Delete the credit layer at the top.
Working from the bottom of the template, up:
Merge Bar 3 down to Bar 2. Merge that layer down to Bar 1.
On your merged Bar layer, Selections- select all.
Float- defloat- invert- delete layer in palette.
Copy & paste PK-GL-P5. Resize 105%. Hit delete on your keyboard.
Select none. Add drop shadow.
Copy & paste PK-GL-P9- Resize 60%. Rotate 20 left. Duplicate.
On Top Left Square: Selections- select all.
Float- defloat- invert- delete layer in palette.
Position one of the rotated papers in the selected area.
Hit delete on your keyboard. Select none.
Repeat for Bottom Left Square with the other rotated paper.
Add drop shadow to both layers.
* Next, delete Bottom Circle layer.
With magic wand, click inside one frame of the Bottom Circle Frames.
Selections- Modify- expand by 2.
Add a new layer & flood fill with the following gradient:
#a14e77- foreground colour
#6e1642- background colour
Radial. Angle-0 Repeats- 6
Horizontal & vertical both at 50.
Repeat with other 2 circle frames on your bottom circle frame.
* Optional:
Add a new layer.
With brush (or brushes) of choice, colour- #dca0be
use brush(es) over your flood-filled circles.
Change the blend mode to overlay or whatever looks best to you.
Repeat * for the Top Circles layer & Circle Frame.
On both circle frame layers (top & bottom): add noise:
Uniform/ Monochrome/ 75%
Then add your drop shadow.
* You may have to drag these frame layers above
your circle & brush layers in the palette.
Next, on Oval Background layer:
Selections- select all. Float- defloat- invert- delete layer in palette.
Copy & paste PK-GL-P13.
Hit delete on your keyboard. Select none.
Apply Tramages Pool Shadow at these settings:
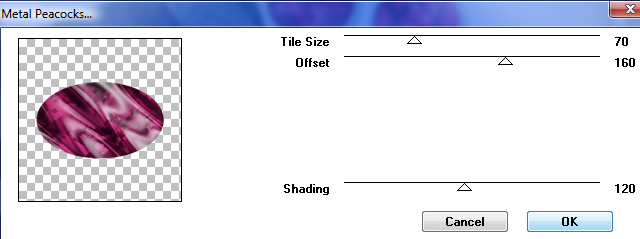
Then apply Metal Peacocks:
Leave the pixel words as is.
On your Oval Frame, add noise:
Uniform/ Monochrome/ 75%
Then drop shadow.
On the Heart Background: use the Hue/Saturation/Lightness
to adjust colour to your preferences.
Then apply Xenofex: Shatter at these settings:

On your frame layer, use your magic wand to click on both sides of the heart.
Selections-Modify, expand by 4. Invert.
On your 'shattered' heart layer, hit delete key to clean up the excess.
Select none.
Now, to add a closeup of your tube there's two different ways to do this.
I did both for you, so you can follow either option 1 or 2.
(The option 2 example of this tag is at the bottom of this tutorial.)
Option #1:
On the Broken Heart Frame, use your magic wand & click inside on one side of the heart.
Selections- Modify- expand by 2. Invert.
Copy & paste your closeup (or tube if you have no closeup).
Resize, if needed, hit delete. Select none.
(Can repeat for other side of heart with another tube from same artist, if you choose)
Option #2:
On the Broken Heart Frame layer, carefully erase the zig zag down the center of the heart.
Then click inside the frame with your magic wand.
Selections- Modify- expand by 2. Invert.
Copy & paste your closeup (or tube if you have no closeup).
Resize, if needed, hit delete. Select none.
On your closeup layer, apply Xero- Porcelain:
Drop the opacity on your closeup layer to 75%.
Add your drop shadow.
Delete the Pixel Words layer.
Now, add your main tube. Position where desired.
Apply Xero- Radiance:
Then add a drop shadow.
Now lets add some elements.
PK-GL-WIRE- place to the top right.
Duplicate. Image- mirror. Image flip. Merge down.
Drag this layer below the bars layer in layer palette.
Add your drop shadow.
PK-GL-PEARLSONSTRING
Resize 60% & sharpen.
Position & add a drop shadow.
PK-GL-ROSE1- Resize 70% & sharpen.
Position on the top left. Add a drop shadow.
Duplicate. Resize this one 80% & sharpen again.
Mirror this one & position like on my tag in the top left.
Merge down onto the other rose layer.
Drag this merged layer below oval layer in layers palette.
PK-GL-BARBED HEART2
Resize 37% & sharpen. Position & add a drop shadow.
Crop & resize tag to your preference.
Now add your copyrights & watermark.
Next add your name.
I rotated mine left 15.
These are the settings I used for the gradient glow:
Add a drop shadow.
Next, delete the Bkgrd Base layer at the bottom.
Merge layers visible & then save as a .PNG & you're done.
This is the other option for this tag:

I hope you enjoyed this tutorial & creating your tag.
I'd love to see any results any of you have trying this.

*hugz*





 Subject: FTU- Heartache Every Moment Tutorial
  Sat 15 May 2021 - 5:14