Original Post Date- 2/1/13, 1:13 AM Central Standard Time*The kit I used for this tutorial is no longer available to download.
The post for the kit is gone off the blog.
Anyway, if you had grabbed this kit in the past,
you still will be able to try this. -Magik 5/23/2021
This tutorial is borne from my own manipulated lil' mind.
Any similarity to any other tutorial(s) is purely coincidental.
This tutorial was written for those who have a working
knowledge of PSP and was written using PSP X2,
tho' any version should work.
Supplies Needed: Scrapkit: I'm using an adorable FTU kit from
Amy of Gimptastic Tuts named Love Bug.
*This kit is no longer posted on their blog.
Tube: of choice.
I'm using one of the bears from the kit.
Do not use any artwork unless you have a license to do so
& have purchased the tube.
Template: Temp 172 from Amy & Leah's Gimptastic Tuts.
Find it
here.
Filters: Eye Candy Impact 5- Gradient Glow
Xero- Radiance
Font: Love Letters
Drop shadows: 0 2 50 5, black for most of the tag
15 12 50 5, black for the bugs
Save your progress often.

Let's do this!

Open up the template.
Duplicate it & close original.
Delete the credit layer at the top.
Expand your canvas so its 550 X 400.
Now, working from the bottom layer of the template, up:
8- Select all- float. Defloat- Invert.
Delete this layer & paste Paper1, resized 80%.
Hit delete & select none.
Crop to canvas.
Drop shadow.
7- Use your manual color correction tool to change the colour:
Source: #d62e61
Target: #ed2046
6- select all- float. Defloat- Invert.
Delete this layer & paste Paper2, resized 80%.
Hit delete & select none.
5- leave as is.
4- Select all- float. Defloat- Invert.
Delete this layer & paste Paper4, resized 60%.
Hit delete.
Select none.
3- Select all- float. Defloat- Invert.
Delete this layer & paste Paper5, resized 60%.
Hit delete. Select none.
Crop to canvas.
Drop shadow.
6- Select all- float. Defloat- Invert.
Delete this layer & paste Paper6, resized 60%.
Hit delete. Select none.
Duplicate. Mirror.
Add a drop shadow to both.
1- delete
words 2 back- drop shadow.
words 2- Manual color correction with #c6112d as your target.
Then add a bevel:
words 1 back- drop shadow
words 1- leave as is.
Next add a bear or tube of choice.
Resize as needed.
For mine, I resized the bear 80%.
Position on the left of the tag.
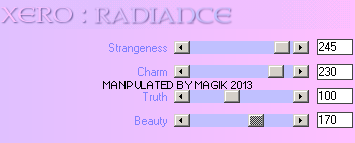
Apply Xero- Radiance at these settings:
Add a drop shadow.
Next we'll add some elements.
For each one I added, I sharpened & added
a drop shadow to, unless specified otherwise.
Lollipop1- 60%.
Rotate 13 right.
Place to the right of tag.
Move below the word art in layers palette.
Letter- 45%.
Place with the lollipop.
HeartScatter- 50%.
Place in top right corner.
Duplicate & move this one to the bottom left.
Merge down.
Heart4- 45%.
Place in bottom left.
Flower1- 55%.
Place in center of tag.
Flower2- 40%.
Rotate 8 right.
Place on the right of flower 1.
Add this flower again.
Resize 37%.
Rotate 8 left & place with the other 2 flowers.
Bug- Duplicate.
Resize 1 35%. Mirror.
Place on the lollipop.
Resize the other one 27%.
Place this one near the flower.
Add the following drop shadow to both: 15 12 50 5, black
Heart2- 45%.
Rotate 20 right.
Place in the bottom right.
Move below the word art in layers palette.
Add any other elements, if you prefer at this time.
Now, crop/ resize your tag to your own preferences.
Then, add your proper copyrights & watermarks.
Next add your name.
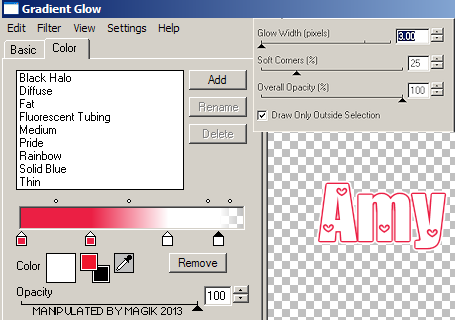
Then add a gradient glow:
Add a drop shadow.
Finally, merge visible, save as a PNG & enjoy.
I really hope you enjoyed making this adorable tag.
I'd love to see your results.

*hugz*
*Originally re-posted Nov 5th 2019 at http://himaddicts.spruz.com/
**Edited & updated by Magik on 23 May, 2021


 Subject: FTU- Would You Be My Valentine?
  Sun 23 May 2021 - 23:30


