Original Post Date- 1/25/13, 6:40 PM Central Standard Time*The kit I used for this tutorial is no longer available for purchase,
however, if you had bought this kit in the past,
you should be able to try this. -Magik 5/23/2021
This tutorial is borne from my own manipulated lil' mind.
Any similarity to any other tutorial(s) is purely coincidental.
This tutorial was written for those who have a working
knowledge of PSP and was written using PSP X2,
tho' any version should work.
Supplies Needed: Scrapkit: I'm using a kit from Purple's Kreationz called Kinky Love.
This kit is no longer in shops.
Tube: I'm using the artwork of Keith Garvey.
I had bought this at Garv-Girls PSP Tubes shop.
Do NOT use this artwork unless you have a license to do so
& have purchased the tube.
Template: Template0017 from me,
here.
Mask: of choice
Filters: Xero- Radiance
Eye Candy Impact 5- Gradient Glow
Font: Scriptina
Drop shadow: 4 2 55 4, black.
Save your progress often.

Let's do this!

Open up the template.
Duplicate it & close original.
Delete the credit layer at the top.
Working from the bottom layer of the template, up:
rounded square 1- Select all- float.
Defloat- Invert.
Delete this layer & paste P2, resized 80%.
Hit delete & select none.
rounded square 2- Select all- float.
Defloat- Invert.
Delete this layer & P10, resized 80%.
Hit delete & select none.
rounded rectangle- select all- float. Defloat- Invert.
Delete this layer & P2, resized 80%.
Hit delete & select none.
Crop to canvas.
Drop shadow.
circle- Select all- float. Defloat- Invert.
Delete this layer & paste P5, resized 80%.
Hit delete & select none.
pixel words- delete
rounded square 3- Select all- float. Defloat- Invert.
Delete this layer & P9, resized 70%.
Hit delete.
Select none.
heart 1- Select all- float. Defloat- Invert.
Delete this layer & P1, resized 80%.
Hit delete. Select none.
Crop to canvas.
Drop shadow.
heart 2- delete
sparkle brush- send this to top in layers palette.
Mirror.
Hide for now.
Customize the word art & word art bkgrd layers to your own preferences.
Add a drop shadow to the word art bkgrd layer.
Move the word art up a little in the canvas.
Next add your main tube,
under the word art layers.
Resize if needed.
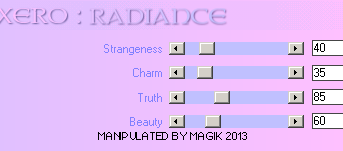
Apply Xero- Radiance at these settings:
Add a drop shadow.
Next we'll add some elements.
For each one I added, I sharpened & added
a drop shadow to, unless specified otherwise.
E16- 40%
Position this one around the word art.
Add the cuffs again, resize 50%.
Use your lasso to make a selection around one of the cuffs:
Promote this selection to layer.
On the original, hit delete & select none.
Flip this promoted cuff.
Move it so it 'connects' with the chain.
Merge down & move in front of the word
'kinky' & under your tube's hand.
E38- 50%.
E31- 65%
E29- 35%.
Rotate 30 left.
E43- 30%.
Place on the candy hearts.
E18- 40%.
Mirror
E15- 47%
E6- 80%
E41- 65%
E14- 50%.
Move this below your tube in layers palette.
E7- 40%
E4- 30%.
Mirror.
Position on the top left of the cage.
E3- 60%.
Place this by the word 'kinky'.
Then move down to just above the handcuffs.
On the handcuffs layer, draw a selection like mine:

Hit delete on the cuffs layer.
E28-40%.
Rotate 42 right.
'Hang' this on the skins box.
Now go back up to the sparkle layer.
Rotate 22 left.
Position as desired & erase any excess.
Add any other elements, if you prefer at this time.
Now, add a paper of choice & apply your mask.
Merge group & move this mask
to just above the white background layer.
Resize your mask about 110%, if needed.
Now, crop/ resize your tag to your own preferences.
Then, add your proper copyrights & watermarks.
Next, add your name.
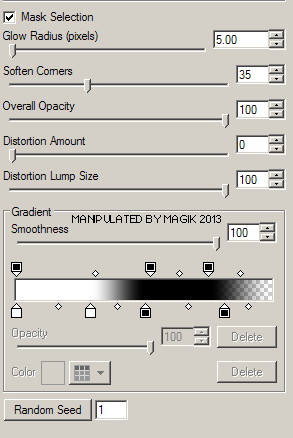
Then add a gradient glow:
And a drop shadow.
Finally, delete the white background, merge visible,
save as a PNG & enjoy.

*hugz*
*Originally re-posted Nov 4th 2019 at http://himaddicts.spruz.com/
**Edited & updated by Magik on 23 May, 2021


 Subject: PTU- Kinky Valentine
  Sun 23 May 2021 - 12:34


