Original Post Date- 10/31/15, 10:43 AM Central Standard Time
This tutorial is borne from my own manipulated lil' mind.
Any similarity to any other tutorial(s) is purely coincidental.
This tutorial was written for those who have a working
knowledge of PSP and was written using PSP X2,
tho' any version should work.
Supplies Needed: Scrapkit: I'm using a PTU kit from Toxic Desirez
named Franken-Pup.
This is exclusive to her
Skullified Scrapz store.
Tube: I'm using the artwork of Ed Mironiuk.
His artwork can be found at
CDO.
Do NOT use any artwork unless you have a license to do so
& have purchased or obtained the tube legally.
Template: Template 189 from Pooker at Elegant Inspirations.
You can find the template
here.
*
Leave her some love for the template.  Mask:
Mask: Halloween Mask 06 2015 from Kristin
which you can find
here.
*
Make sure to say thank you. Filters: Penta- Color Dot
Eye Candy 4000- HSB Noise
Penta- Jeans
Xero- Fritillary
Tramages- Tow The Line
Eye Candy 4000- Gradient Glow
Font: Angryblue
Drop shadows: 2 2 50 8, black.
-35 30 65 12, black- for the tube
Save your progress often.
Let's do this!

Open up the template.
Duplicate it & close original.
Resize the template so it's 650 px in width,
making sure 'Resize All Layers' is ticked.
Delete the credit layer at the top.
Working from the bottom layer of the template, up:
Copy & paste a Paper 11 (or paper of choice)
above the empty Background layer.
Apply the mask & merge group.
Grey Circle2- Select all- float. Defloat.
Delete this layer & add a new layer.
Flood fill with #65a32f.
Select none.
Apply Penta- Color Dot at these settings:
Add a drop shadow.
Grey Circle1- Repeat the same steps as above.
White Dotted- Using your Manual Color Correction tool,
change the white to black.
Do this for both layers.
White Circle6- Select all- float. Defloat- Invert.
Delete this layer & paste Paper 9, resized 80%.
Hit delete & select none.
White Circle5- select all- float. Defloat- Invert.
Delete this layer & paste Paper 4, resized 80%.
Hit delete & select none.
Green Circle2- Select all- float. Defloat.
Delete this layer & add a new layer.
Flood fill with #a09d9e.
Select none.
Apply HSB Noise at default settings.
Add a drop shadow.
Green Circle1- Repeat the same steps
as you did for the other green circle layer.
White Circle4- Select all- float. Defloat- Invert.
Delete this layer & paste Paper 10, resized 70%.
Hit delete.
Select none.
Crop to canvas.
Apply Penta- Jeans at these settings:
White Circle3- Do the same as above,
using the same paper.
Grey Dotted- leave both layers as they are.
Lt Green Circle2- Select all- float. Defloat.
Delete this layer & add a new layer.
Flood fill with #302d2c.
Select none.
Apply Xero- Fritillary at these settings:
Add a drop shadow.
Lt Green Circle1- Repeat the same steps as before.
White Circle2- Select all- float. Defloat- Invert.
Delete this layer & paste Paper 8, resized 70%.
Hit delete.
Select none.
White Circle1- Repeat the same steps,
using the same paper.
Grey Dotted1 & Grey Dotted2- delete.
Grey Rectangle- Select all- float. Defloat.
Delete this layer & add a new layer.
Flood fill with a gradient:
Angle- 135/ Repeats- 4
Colours- #000000 & #4e4e4e.
Select none.
Apply Tramages- Tow The Line
at default settings.
Add a drop shadow.
White Border- Using your Manual Color Correction tool,
change the white to #86e232
or another colour of choice.
Add some noise:
Gaussian/ Monochrome/ 50%.
Lt Green Squares- Select all- float. Defloat- Invert.
Keep this layer for now & paste Paper 4, resized 70%.
Hit delete.
Keep selected.
Go back to the light green squares layer.
Invert.
Selections- Modify- Expand by 3.
Flood fill with #65a32f.
Select none.
Next we'll add some elements.
For each one, I added a drop shadow to,
unless specified otherwise.
Ribbon- Resize 70%.
Flip.
Position on the lower part of the black rectangle.
Web- resize 50%.
Place on the upper left.
Effects- Edge Effects- Enhance.
Flower 1- Resize 37%.
Place on the left side
like my example.
Duplicate & mirror.
Skull & Spiders- Resize 30%.
Place on the right
so it hangs below the flower.
Move below the flower in layers palette.
Castle- Resize 55%.
Mirror.
Position on the lower right.
Pumpkin 2- Resize 25%.
Position on the left of the castle.
Book- 20%.
Place in the bottom center,
next to the pumpkin.
Candy 1- Resize 15%.
Place by the pumpkin.
Duplicate & mirror the top one.
Rotate your bottom candy 12 left.
Sharpen.
Position the mirrored candy to right of the other one.
Move below the other in layers palette.
Coffin- 35%.
Position on the left, like my example.
Border- 65%.
Place above the black rectangle
in the center of the tag.
Moon- Resize 27%.
Move to upper right of the tag.
Candy Corn- Resize 17%.
Place in front of the book & pumpkin,
so it's slightly off to the right from center.
Kitty Bat- Resize 25%.
Mirror.
Place on the lower left.
Bat- Resize 25%.
Mirror.
Place in the upper left corner.
Skull 1- Resize 17%.
Position slightly off to the left
on the bottom.
Candle- Resize 20%.
Place on the right side of the cat.
Raven- Resize 13%.
Position on the top of the pumpkin.
Ghost- Resize 35%.
Mirror.
Rotate 30 left.
Position in the upper right,
like my example.
When adding the drop shadow,
I ticked the 'shadow on new layer' box.
I then lowered the opacity of the shadow layer to 50%.
Next add your main tube.
Resize if needed.
Position in the center of the tag.
Move below the skull in layers palette.
Duplicate.
On the duplicate,
add a Gaussian blur of 3.
Then change the blend mode to Screen at 60%.
Add a drop shadow to the bottom tube
at these settings: -35 30 65 12, black-
to get a nice 'realistic' shadow.
Add any other elements, if you prefer at this time,
making sure to change your drop shadow settings.
When finished adding elements,
copy & paste the sparkles.
Resize them 75%.
Move down slightly in canvas.
Use your eraser to remove any unwanted excess.
Now, crop/ resize your tag to your own preferences.
Then, add your proper copyrights & watermarks.
Next add your name.
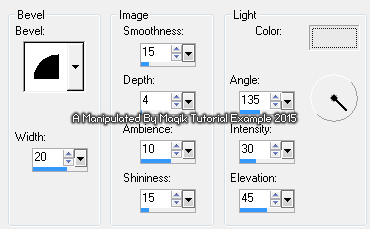
Add a bevel:
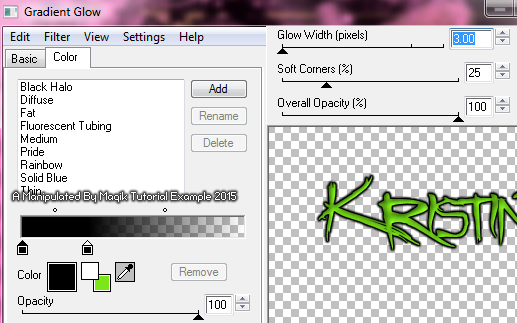
Then add a gradient glow:
Finally, add a drop shadow,
using the original settings of 2 2 50 8, black.
Merge visible, save as a PNG & enjoy.

I hope you enjoyed trying this tutorial.
I'd love to see your results.
You can send them to me at:
MagikD[@]live.com
(remove the brackets in my email.)
*hugz*
*Originally re-posted Nov 7th 2019 at http://himaddicts.spruz.com/
**Edited & updated by Magik on 29 May, 2021


 Subject: PTU Tutorial- Hang In There
  Sat 29 May 2021 - 19:53