Original Post Date- 6/9/12, 6:02 AM Central Standard Time

This is a forum set that will go nicely with the Urban Chic
tag that's also posted, for a three-piece set.

This tutorial is borne from my own manipulated lil' mind.
Any similarity to any other tutorial(s) is purely coincidental.
This tutorial was written for those who have a working
knowledge of PSP and was written using PSP XI,
tho' any version
should work.
Supplies Needed: Scrapkit: The chic kit- Urban Glam-
from Tasha's Playground.
This kit was a PTU kit & now
here for download.
Tube: I'm using the gorgeous artwork of Zlata M,
which you can find at
PFD.
Do NOT use this artwork unless you have a license
to do so & have purchased the tube.
My gradient, which can be found in my supplies
from my previous tutorial,
Here.
Filters: Filter Factory B- Sliding Spirals
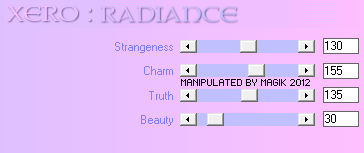
Xero- Radiance
Eye Candy 4000 Gradient Glow
Font: Urban Hook-Up
Drop shadow used in this tutorial is 0 0 80 4.
Let's do this!
Save your progress often.
Unzip my supplies.
Copy the gradient to your PSP Gradients folder.
The other supplies are not needed for this forum set.
For the tag:Open a new canvas 650 X 250 px.
Copy & paste one of the 'glitter' papers of choice.
Rename this layer background base.
Next, copy & paste frame 1.
Resize 35%.
Rotate 45 right.
Sharpen. Duplicate.
Resize this second one 80%.
Sharpen again.
Place on the left.
Duplicate & mirror.
With your magic wand, click inside the left frame.
Modify & expand by 2. Invert.
Copy & paste a paper of choice.
Hit delete.
Add your closeup.
Resize 35%.
Hit delete again.
Select none.
Do the same for the right frame, using the same
paper & resizing your closeup 30%.
Repeat again for the middle frame,
this time using a different paper
& resizing your closeup 55%.
Move all the frames to the top in layers palette.
Crop to canvas.
On your middle closeup,
set the blend mode to Luminance (L).
Merge the left & right closeups together
& apply Xero-Radiance:
Add a drop shadow to the closeups & your frames.
Add the brokenglass.
Move below the frame, closeup & paper layers.
Sharpen, Crop to canvas.
Add the heart2. Resize 70%.
Sharpen & add a drop shadow.
Next, add a new layer.
Using my gradient-
Angle set to 45, repeats- 2- Flood fill this layer.
Selections- Select all- Modify- contract by 4.
Hit delete & select none.
Add a new layer.
Flood fill with black.
Selections- Select all- Modify-
contract by 1.
Hit delete & select none.
Now add your proper copyrights & watermarks.
Now, add your name, using my gradient:
Angle- 45, repeats- 3.
Give it a gradient glow:
Then add a drop shadow.
To animate:
Go back down to the background base layer.
Duplicate it 3 times, for a total of 4.
Rename these duplicates
Spiral 1
Spiral 2
Spiral 3.
Close off Spiral 2 & 3 for now.
On Spiral 1, apply Filter Factory B- Sliding Spirals at default settings:
Change the blend mode to Screen.
Hide for now.
On Spiral 2, apply Filter Factory B- Sliding Spirals,
changing the zoom in/ out to 35.
Change the blend mode to screen.
Hide for now.
On Spiral 3, do the same thing,
changing the zoom in/ out to 95.
Again, set the blend mode to Screen.
Hide for now & reopen Spiral 1.
Now, copy merged & paste into Animation Shop.
Go back to PSP & hide Spiral 1 & unhide Spiral 2.
Copy merged & paste after current frame in A.S.
Go back to PSP & hide Spiral 2 & unhide Spiral 3.
Copy merged & paste after current frame in A.S.
You should have 3 frames.
Save as gif
& you're done with the tag.
Now to do the avi:
New image: 150 X 150 px.
Copy & paste the same glitter paper
of choice from your tag into the canvas.
Crop to canvas.
Next, add a new layer.
Using my gradient-
Angle set to 45, repeats- 2, Flood fill this layer.
Selections- Select all- Modify-contract by 4.
Hit delete & select none.
Add a new layer. Flood fill with black.
Selections- Select all- Modify- contract by 1.
Hit delete & select none.
Rotate 45 left, making sure all layers is ticked.
Using your magic wand, click inside the gradient border layer.
Modify & expand by 2. Invert.
Copy & paste your closeup.
Resize 50%.
Hit delete & select none.
Crop to canvas.
Apply Xero- Radiance at the same settings as the tag.
Add your drop shadow.
Move this layer below your gradient border layer.
Next, add your proper copyrights & watermarks.
Now, add your initial,
using the same gradient setting as we used for the tag.
Add the same gradient glow
& drop shadow.
To animate:
Duplicate your gradient border twice for a total of three.
Name them border 1, border 2, border 3.
On the border 1 layer, add noise-
Uniform/ Monochrome/ 45%.
Hide this layer for now.
Open the border 2 layer. Add noise-
Uniform/ Monochrome/ 50%.
Hide this layer for now.
Open the border 3 layer. Add noise
Uniform/ Monochrome/ 55%.
Hide this layer.
Unhide the border 1 layer.
Copy merged into Animation Shop.
Go back to PSP & hide border 1 & open border 2.
Copy merged & paste after current frame in A.S.
Go back to PSP & hide border 2 & open border 3.
Copy merged & paste after current frame in A.S.
You should have 3 frames.
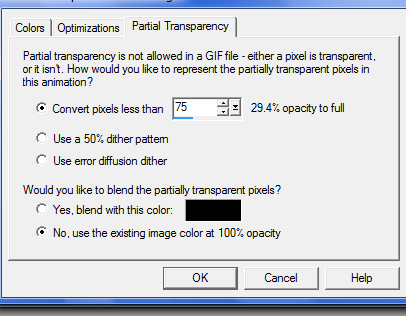
Save as a gif at these settings:
Enjoy your forum set.

*hugz*


 Subject: PTU Now FTU- PTU- Urban Chic Forum Set
  Thu 20 May 2021 - 13:47