Original Post Date- 3/2/13, 11:50 AM Central Standard Time

This is part two for a beautiful 3-pc set.

This tutorial is borne from my own manipulated lil' mind.
Any similarity to any other tutorial(s) is purely coincidental.
This tutorial was written for those who have a working
knowledge of PSP and was written using PSP X2,
tho' any version should work.
Supplies Needed: Scrapkit: I'm using a lovely PTU kit from Tasha
named Lucky Girl.
This kit was once PTU but now you can grab it for free
here.
*Leave a thank you for the kit.  Tube:
Tube: I'm using the gorgeous artwork of Alex Prihodko.
You can find more of this artwork at
PicsForDesign.
Do NOT use this artwork unless you have a license to do so
& have purchased the tube.
Templates: I'm using templates 201FSmpm & 201AVmpm
from Millies PSP Madness.
You can grab these
here.
*Leave some lovin' when downloadin' Animation: SimoneAni315 & SimoneAni316 from Simone.
You can find these
here.
*Leave some love for the animations. Filters: Eye Candy 4000- Gradient Glow
Font: Pristina
Drop shadows: 2 2 45 4, black for most of the tag.
8 5 65 4, black for the butterfly.
Animation Shop- if animating
Save your progress often.
Let's do this!

Open up the 201FSmpm template.
Duplicate & close original.
Delete the credit layer at the top.
Now, working from the bottom layer of the template, up:
1- Select all- float. Defloat- Invert.
Delete this layer & paste paper8, resized 80%.
Hit delete & select none.
Crop to canvas.
NO drop shadow.
Duplicate this paper layer
& change the top one's blend mode to multiply.
2- Use your manual color correction to change the colour:
#c0c0c0 as your source & #ffb32a as the target.
3- Select all- float. Defloat- Invert.
Paste your tube or closeup, resizing as needed.
Hit delete & select none.
Crop to canvas.
Duplicate your closeup.
On the top one, add a Gaussian blur at 3.00
Change the blend mode to Soft Light.
On the bottom one, change the blend mode to Luminance (L).
Then on this bottom one, add the blinds texture effect:
Width- 2, Opacity- 20, color- black.
Leave the Horizontal & Light from top/ left unticked.
Merge 6 down onto 5 & then down onto 4.
Use your manual color correction tool to change to orange
(use black as your source colour).
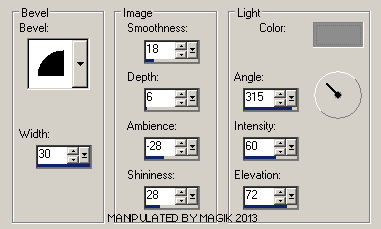
Give it a nice puffy look with a bevel:
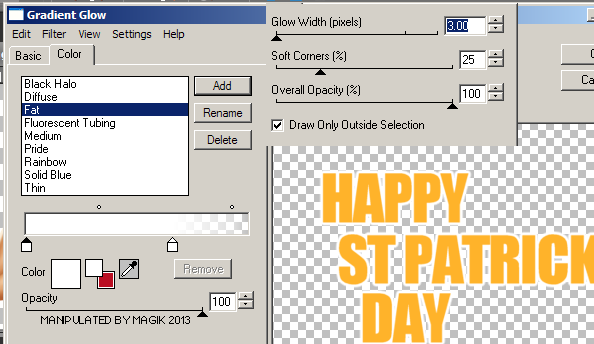
Then add a fat gradient glow in white:
Then add a drop shadow.
Delete both the shamrocks.
Next we'll add a few elements.
For each one I added, I sharpened & added
a drop shadow to, unless specified otherwise.
swirl- 40%.
Rotate 70 right & mirror.
Place on the left.
Move below your word art in layers palette.
horseshoe2- 30%.
Use your deform (pick) tool to rotate it around.
Then use your lasso to make a selection around
part of the horseshoe, like we did for the main tag:
Hit delete & select none.
butterfly2- 37%.
Mirror.
Add the following drop shadow:
8 5 65 4, black
Now, add your proper copyrights & watermarks.
Next add your name.
Then add a gradient glow:
And a drop shadow.
If not animating, merge visible save as a PNG & enjoy.
 If animating, continue:
Open up SimoneAni316 in Animation Shop.
Duplicate & close the original.
Resize the animation so it's 425 px wide.
Now, back in PSP, delete the white background
at the bottom of the template.
Then, close all the layers from the word art up.
Merge the open bottom layers & copy & paste into A.S.
Then, in A.S., right click & insert frames- Empty.
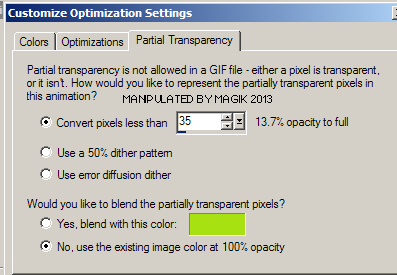
Use these settings to add your frames:

Next, select all on your animation.
Copy.
Then on your tag bottom,
hit CTRL & E on your keyboard.
Position this near the bottom of your tag.
Once you have the animation where you want it, click.
Now, click on the animation again.
Select all, then click on Animation- Mirror.
Then select all & copy.
Back on your tag bottom,
hit CTRL & E again on your keyboard.
Position this near the top of your tag.
Once you have the animation where you want it, click.
Back in PSP, close the merged bottom layer &
open the top layers.
Copy merged & paste into A.S.
On your tag with the animation,
make sure all frames are selected.
Click propagate paste in the tool bar at the top in A.S.
Now, click your top part of your tag & drag it into your animated tag.
Once you have it positioned where you want it, click.
Save it with these settings for the optimizing:
Now, go back to PSP for the avatar.
Open up the 201AVmpm template.
Duplicate & close original.
Delete the credit layer at the top.
Now, working from the bottom layer, up:
Delete the closed background layer at the bottom.
1- Use your manual color correction to change the colour:
#c0c0c0 as your source & #ffb32a as the target.
2- Use your manual color correction to change the colour:
the light green as your source & black as the target.
Then, select all- float. Defloat.
Modify- contract by 7. Invert.
Paste your tube or closeup, resizing as needed.
Hit delete & select none.
Crop to canvas.
Duplicate your closeup.
On the top one, add a Gaussian blur at 3.00
Change the blend mode to Soft Light.
On the bottom one, change the blend mode to Luminance (L).
Then on this bottom one, add the blinds texture effect:
Width- 2, Opacity- 20, color- black.
Leave the Horizontal & Light from top/ left unticked.
3, 4 & 5- delete these layers.
6- Use your manual color correction to change the colour:
black as your source & #fc9dcf as the target.
Now, add your proper copyrights & watermarks.
Then, add your name or initial.
Use these gradient glow settings:

NO drop shadow.
If not animating, merge visible save as a PNG & enjoy.
To animate the avi., continue.Open up SimoneAni315 in A.S.
Duplicate & close the original.
Resize this animation so its 80 px wide.
In PSP, hide the layer with your name or initial
& copy merged.
Paste the merged avi in A.S.
Then, right click & insert frames- Empty.
Use these settings to add your frames:

Now, on the animation, select all & then copy.
On the avi, select all & then hit CTRL & E on your keyboard.
Place the animation in the lower corner
(but not too close to the edge).
When you have it where you want it, click.
Now, go back to PSP & unhide your name/ initial.
Copy & paste in A.S.
On your avi with the animation,
make sure all frames are selected.
Click propagate paste in the tool bar at the top in A.S.
(if it's not already selected).
Now, click your name/ initial
& drag it into your animated avi.
Once you have it positioned
where you want it, click.
Save with the same optimization settings as we used
for the forum tag & you're finished.
If you completed both tutorials,
you should now have a 3-pc. set your
friends will envy.
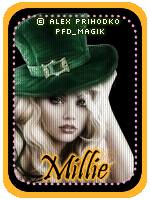
Here's a set for Millie:

I hope you enjoyed trying these tutorials.
As always, I love to see your results.
*hugz*
*Originally re-posted Nov 5th 2019 at http://himaddicts.spruz.com/
**Edited & updated by Magik on 24 May, 2021


 Subject: PTU Now FTU- Happy St. Patty's Day (Part 2- Forum Set)
  Mon 24 May 2021 - 0:26