Original Post Date- 7/6/15, 3:09 AM Central Standard Time*The template I used for this tutorial is no longer available,
however, if you had download it in the past,
you still will be able to try this.  -Magik 5/29/2021
This tutorial is borne from my own manipulated lil' mind.
Any similarity to any other tutorial(s) is purely coincidental.
This tutorial was written for those who have a working
knowledge of PSP and was written using PSP X2,
tho' any version should work.
Supplies Needed: Scrapkit: I'm using the gorgeous
Dark Forest kit from Toxic Desirez.
You can find this kit in her store
here.
Tube: I'm using the artwork of Deacon Black.
I had bought this amazing tube at
CDO.
He has since left the store.
Do NOT use any artwork unless you have a license to do so
& have purchased or obtained the tube legally.
Filters: Eye Candy 4000- Gradient Glow
Animation(s): SimoneAni291 which you can grab
from her pack SimoneAni291-295
here.
I also used SimoneAni-Bats002 which you can grab
here.
*
Leave love for your downloads.  Font:
Font: Mon Amour Script Pro
Drop shadow: of choice, but only as specified,
if animating the tag.
Save your progress often.

Let's do this!

Open a new canvas 650 X 650 px.
Copy & paste the Cave.
Resize 65%.
Move up in the canvas so it's about an inch
away from the top.
Next, copy & paste the Arch.
Resize 80%.
Move up in your canvas above the cave.
The bottom of the arch should be even with
the bottom of the cave.
Next, copy & paste Frame 3.
Resize 65%.
Rotate 7 left.
Move to the left of canvas.
Duplicate. Mirror.
Sharpen both.
Select your magic wand tool with these settings:
Click inside the left frame.
Selections- Modify- Expand by 3. Invert.
Copy & paste a paper of choice.
Resize 60%.
Hit delete.
Copy & paste your tube or closeup.
Resize as desired.
Hit delete.
Select none.
Crop to canvas.
Move the paper & tube below the frame in layers palette.
On your tube, add a drop shadow of choice.
For the right frame,
Click inside with your magic wand.
Selections- Modify- Expand by 3. Invert.
Copy & paste the same paper of choice.
Resize 60%.
Hit delete.
Mirror your tube or closeup
& copy & paste.
Resize as desired.
Hit delete.
Select none.
Crop to canvas.
Move paper & tube below the frame in layers palette.
Add a drop shadow to the tube only.
Next we'll add some elements.
Only add your drop shadow of choice to
the elements as specified, if animating.
Grass- Resize 70%.
Move towards the bottom of the tag.
Move below the frames, tubes & papers
in layers palette.
Keep the grass layer active in layers palette
& then copy the Grave Yard.
Resize 55%.
Position so that it lays just over the grass
& at the mouth of the cave.
Smoke- 40%. Flip.
Place this at the bottom edge of the graveyard.
NO drop shadow.
Box- 35%. Mirror.
Place this off to the left like my example.
Tree 1- 55%. Mirror.
Place on the left to the left of the frame.
Drop shadow.
Fairy- 27%.
Place her in the upper right,
just above the right eye of the cave's 'face'.
Drop shadow.
Vines- 60%.
Place on the left side, on the left of the frame.
Duplicate & mirror.
Add a drop shadow to each.
Shrooms 1- 33%.
Position on the left of the tag.
Add your drop shadow.
Flower 2- 20%.
Tuck this behind the shrooms
at the bottom of the left frame.
Duplicate & mirror.
Drop shadow both.
Cross- 35%. Rotate 9 right.
Place this on the left of the right frame.
Drop shadow.
Flower Vines- 40%.
Place on the right side on top of the right frame.
Drop shadow.
Tree 2- 60%.
Place just off to the right
of the mouth of the cave.
Drop shadow.
Shrooms 2- 30%.
Place on the lower right.
NO drop shadow, if animating.
Stump- 27%.
Place on the lower right.
Drop shadow.
Roses- 45%.
Place off to the left of the
mouth of the cave.
Drop shadow.
Bird 1- 22%.
Place this on the tree on the left.
Drop shadow.
Frog- 17%.
Place on the lower right by the stump.
Duplicate.
Mirror this one & resize 75%.
Position this one on the shrooms on the left.
Drop shadow.
Bird 2- Mirror. Resize 15%.
Place this on the stump on the right.
Drop shadow.
Spider- 13%.
Place on the box.
Drop shadow.
Add any other elements if you prefer.
Crop & resize to your own liking.
Now add your proper copyrights & watermarks.
Now add your name.
Add a gradient glow at these settings:

Then add your drop shadow to this layer.
If saving as a PNG,
you may copy & paste a paper & apply a mask of choice.
Send this mask layer to the bottom in your layers palette.
Resize as needed.
Then, merge visible & save as a PNG & enjoy.

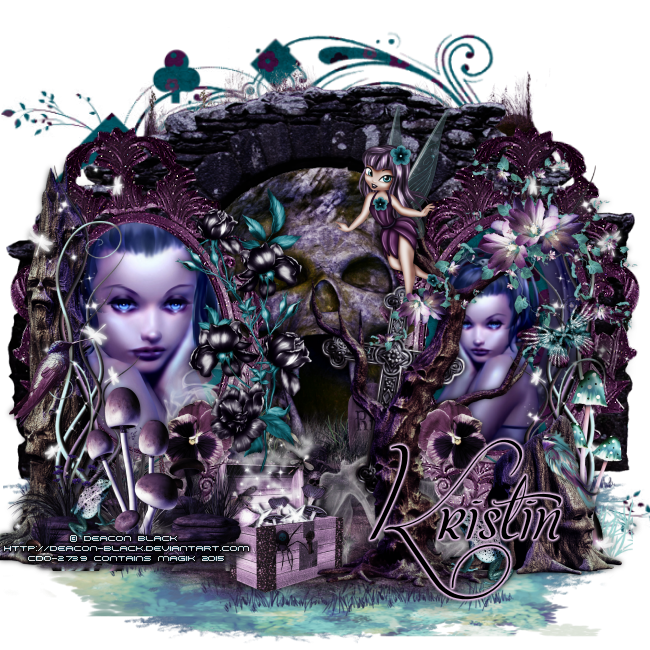
This is my PNG example:
If animating, please continue...
To Animate:Open your animation or animations in A.S.
Duplicate the animation(s) & close the original(s).
For mine, I kept my tag the size I started with,
so I resized my bats animation so it was 350 px. wide.
Back in PSP, duplicate your image file of your tag.
This is to make it easier & saves your 'base' tag.

Starting at the top in the layers palette,
close all layers down to the frames.
Copy merged & paste into A.S.
The animation I'm using has 16 frames.
So on your image in A.S., right click.
Insert Frames- Empty.
In the box that pops up, in the top box,
type 15 (or
1 number LESS than what your animation has).
Then in the next box, type 2.
Make sure the Carry Forward contents
of proceeding frame is ticked:
Click ok.
You should now have 16 frames
(or however many you need for your tag.)
Now, back to your animation.
Select all (CTRL & A keys).
Copy- (CTRL & C keys)
Then, on your image we're animating:
Select all (CTRL & A keys)
Then paste into frame (CTRL & E keys)-
Don't Click!!
I positioned the bats so that they
start right at the bottom of the mouth of the cave.
Once you have it positioned where you want it, click.
Play your animation to make sure they
copied over correctly & that the animation
is where you want it.

If adding another animation
(make sure it's the same amount of frames!),
click on your second animation.
Select all (CTRL & A keys).
Copy- (CTRL & C keys)
Then, on your image we're animating,
Select all (CTRL & A keys)
Then paste into frame (CTRL & E keys)-
Don't Click!!
I positioned this on the left of the cave's mouth.
Once you have it positioned where you want it, click.
I did copy it again & placed on the right side as well.

Play your animation to make sure they
copied over correctly & that the animation
is where you want it.

Now, back in PSP, close all the currently open layers.
Open the other layers.
Copy merged.
Paste as a new animation in A.S.
In your tool bar, click the propagate paste,
like my arrow shows in my example:
Then, on your image you added the animation(s) to, Select all.
Then on your frame image you just pasted into A.S.,
click on it & drag it into your animated image.
Don't Click!
Once you have it positioned where you want it,
release your mouse button (or click).
The following screen shots are the settings
in Optimization Wizard to save as a gif without a background:
For mine, for the blend colour in the last screen,
I used an 'off black' colour: #0C090E
I hope you enjoyed trying this tutorial.
As always, I'd love to see your results.

*hugz*
*Originally re-posted Nov 7th 2019 at http://himaddicts.spruz.com/
**Edited & updated by Magik on 29 May, 2021


 Subject: PTU Tutorial- The Mirror's Truth
  Sat 29 May 2021 - 8:22
 -Magik 5/29/2021


